
 |
| Black Acorn, found Longton Park, Sept 2013 |
Monday, 30 September 2013
No. 27, 30 Day Challenge, Black Acorn
I found this little black acorn in the local park. I don't know anything about it but it's a lovely little thing, so I thought I'd paint it before it withers away. It's tiny.... only about 1.5cm across! It has to be my favourite subject so far... so simple and quick to paint too!
Colours: First I laid down a wash of Manganese Blue Hue and Cobalt Violet, leaving the centre of the brightest highlight clear. I added a light wash of Indanthrene Blue and Permanent Carmine. A small amount of Aureolin was added to the same mix and added a couple more washes laid down to achieve the velvet black colour, the first wash was added while the previous layer was still damp so that the edges of the shine at the base and around the highlights remained smooth and soft. I added a little French Ultra Green Shade and Violet Dioxide to the right hand side for reflected light. Detail in the form of fine lines was added to the acorn using a size 1 brush using the black mix. A very small amount of Raw Umber was added at the base of the acorn. For the cap I used a mix of Raw Umber and Cobalt blue. The stalk I used raw Umber and Perylene Maroon and a very light wash of Manganese Blue Hue in selected places for the highlight.
Sunday, 29 September 2013
Day 26 of the 30 Day Challenge, Autumn Mahonia Leaf
I found this leaf a couple of days ago in the local park. It's some type of Mahonia and was still on the plant, which had just starting to change colour on odd leaves, this was the most advanced with just a small amount of green remaining at the base and leaf margin. It belongs to the same plant family as the two leaves I painted earlier in the challenge, they were old leaves, found in the leaf litter, so probably from last year. This one is much brighter. Doesn't seem possible that a plant can change from a dark green to such an intense red!
 Colours: A wash of Transparent Yellow was laid down first. While still wet I added a mix of Quinacridone Red and Permanent Carmine. I continued to work on the leaf while wet and added Perylene Maroon to the red mix to darken slightly. I layered the washes and painted around some of the most dominant veins. I also added a mix of Raw Umber and French Ultramarine for the light brown areas and Cerulean Blue on the Highlights. For the green I used a mix of French Ultra Green Shade and Transparent Yellow. While still damp I added some faint brush work to pick out the darker edges around the veins using Perylene Maroon and Burnt Umber - this approach gives softer edges and the suggestion of veins. Once dry I added some dry brush work wher the reds were richer and added some Neutral Tint to the red mix. A final wash of the initial red mix was applied in selected areas but adding some Aureolin to it this time, this served to brighten the reds in places. I continued to add detail around the veins, leaf margin and in the indentations where the leaf curves.

Saturday, 28 September 2013
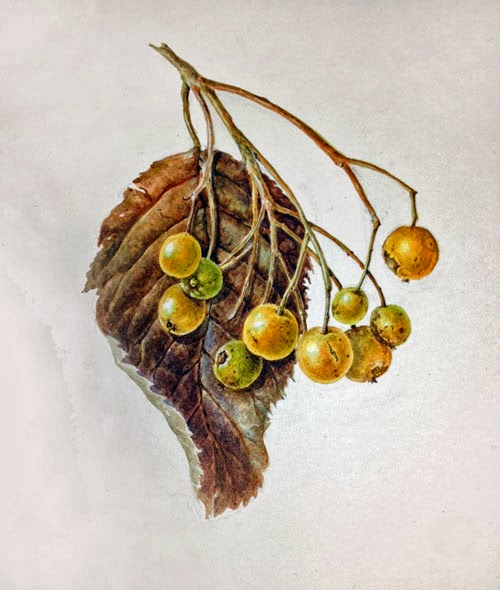
No. 25, 30 Day Challenge, Portugal Laurel Berries
Not long to go now!! not sure how I'm going to finish this challenge because I'm travelling to Amsterdam on Tuesday....but I'm sure I'll find something on route and when I get there!
Today I chose the very pretty Portugal Laurel, Prunus lusitanica, such a lovely variation in colour in these berries so I couldn't resist! Started it this morning but had other things to do so finished tonight. These days I find natural light so much better to work in than artificial light....but no choice and the nights are drawing in fast now too, so it's back to the lamp!
Colours: For the red berries: Quinacridone Red and Permanent Carmine.
For the green/ yellow berries/ Red. First a wash of Green Gold, followed by a blended wash of Aureolin and Manganese Blue Hue mixed to make green and blended into a mix of Quinacridone Red.
Once the basic washes were down I started to add dry brush on the reds a mix of Permanent carmine and Indanthene Blue. In the areas where the red was warmer I used Perylene Maroon. To brighten areas I added a light wash of the Quin red and Aureolin.
Stem. The same green mix was used as for the berries. Permanet Carmine was added to the red stem areas and the small details. For the remaining old filaments and anthers I used Burnt Sienna and Sepia.
Today I chose the very pretty Portugal Laurel, Prunus lusitanica, such a lovely variation in colour in these berries so I couldn't resist! Started it this morning but had other things to do so finished tonight. These days I find natural light so much better to work in than artificial light....but no choice and the nights are drawing in fast now too, so it's back to the lamp!
 |
| Portugal Laurel, from Longton Park, Sept 2013 |
 |
| Detail |
For the green/ yellow berries/ Red. First a wash of Green Gold, followed by a blended wash of Aureolin and Manganese Blue Hue mixed to make green and blended into a mix of Quinacridone Red.
Once the basic washes were down I started to add dry brush on the reds a mix of Permanent carmine and Indanthene Blue. In the areas where the red was warmer I used Perylene Maroon. To brighten areas I added a light wash of the Quin red and Aureolin.
Stem. The same green mix was used as for the berries. Permanet Carmine was added to the red stem areas and the small details. For the remaining old filaments and anthers I used Burnt Sienna and Sepia.
Friday, 27 September 2013
No. 24, 30 day Challenge, Maple Leaf
Rushed attempt today, not happy with this.... but here it is! There are actually 2 leaves drawn on the page but it's been one of those days! A fairly short post blog post tonight too.
These leaves are a bit tricky because they have no shine at all, that makes for a bit of a flat painting. I suppose I suppose I could have wet the leaf to create a shine but I'm afraid I started started off with little thought today.

Colours: First wash, Naples Yellow all over. Pink colour wash applied selectively on top of the yellow, using Permanent Rose. Try not to form lines at either side of each vein because this results in 'tram lines' - unnatural looking relief veins.
Continue to build up the pink. Add darker detail, picking out veins, blemishes and leaf margin, using a mix of French Ultramrine and Burnt Sienna. A light wash of Aureolin was added to brighten the yellow. To get he dark leaf margin wet around the edge of the leaf and drop the colour on so that it blends rather than forming an outline. I would have normally continued with dry brush work at this point but had to leave it at this point.
Thursday, 26 September 2013
No. 23, 30 day Challenge, Conkers
A painting challenge at this time of year just wouldn't be complete without a conker! Love collecting conkers but I'm sure that they're smaller than they used to be when I was a child....or maybe it's because I'm bigger! Anyway here is my conker offering for the 30 day Challenge.....just one more week to go!


The Horse Chestnut leaf is one of my favourites to paint, they're amazing colours as they age! A slight aside but here are a couple of leaves painted over the last few of years.
Colours: Conker. Outer casing. A wash of Cinereous Blue ( Sennelier) and Transparent Yellow with a very small amount of Permanent Alizarin Crimson to take the edge of the bright green. Highlights were left clear. A small amount of Cerulean Blue on the highlights. Build up in layers adding a wash of Green Gold. For the dark markings I used various combinations of Burnt Sienna, Raw Umber and adding Indanthrene Blue for the darkest marks.
Conker, Burnt Sienna and Perylene Maroon applied in washes, leaving the highlights clear. Dry brush was used to build up the depth of colour and texture and a small amount of Neutral Tint was added for the darkest shades. I also used Cerulean Blue around the highlight and Cobalt Violet for reflected light. I used Ultraviolet for the shadows.
 |
| Conkers, Sept 2013 |


 |
| Horse Chestnut leaf on vellum 2011 |
 |
| Horse Chestnut leaf 2012 |
Conker, Burnt Sienna and Perylene Maroon applied in washes, leaving the highlights clear. Dry brush was used to build up the depth of colour and texture and a small amount of Neutral Tint was added for the darkest shades. I also used Cerulean Blue around the highlight and Cobalt Violet for reflected light. I used Ultraviolet for the shadows.
Wednesday, 25 September 2013
No. 22, Acorns with Wasp ' Knopper' Galls
I visited Longton park in the pouring rain this morning. Things have changed a good bit since I was last there several weeks ago and the leaves are now starting to turn golden and falling. Got a lovely haul of things to paint, most of which had fallen to the ground....probably enough subject material for another week of painting. First up are these Acorns with their curious wasp galls.


The Acorn Gall wasp, Andricus quercuscalicis, causes these strange Knopper Galls on Oak acorns. The wasp oviposits its eggs in the acorn in early Summer as the acorn starts to develop. The egg hatches into a grub which then secretes chemicals causing a gall to form. The grub pupates inside the gall and emerges in the following year.
The wasp has a two generations per year and requires both native Pedunculate( English Oak) Quercus robur or sometimes in Sessile oak, Q.petraea, and, Turkey Oak Q. cerris . The first generation of adult wasps to emerge in spring are all female, they lay their eggs in the young oak buds. The second generation of the life cycle sees sexually reproducing male and female wasps emerge from the galls, the female returns to lay eggs on the English Oak and the cycle begins again. The Acorn Gall wasp has only been known to be in Britain since the 1950's, having made its way north from Europe. The introduction of the Turkey Oak to Britain in the 1700's eventually facilitated the arrival of the wasp from Europe.
Colours: Lower acorn, Gold Ochre and Burnt Sienna, built up in washes with a wash of Transparent Yellow applied on top. Highlights were left clear and a small amount of Cerulean Blue used to bring the highlight forward. A little dry brush work was used the build up the rich colour on the acorn. Acorn 'cap', Green gold, Indanthrene Blue and some Burnt Sienna on top for the indents.
Gall, Burnt Sienna and Raw Umber with Ultraviolet and Indanth Blue for the shadows.

The Acorn Gall wasp, Andricus quercuscalicis, causes these strange Knopper Galls on Oak acorns. The wasp oviposits its eggs in the acorn in early Summer as the acorn starts to develop. The egg hatches into a grub which then secretes chemicals causing a gall to form. The grub pupates inside the gall and emerges in the following year.
The wasp has a two generations per year and requires both native Pedunculate( English Oak) Quercus robur or sometimes in Sessile oak, Q.petraea, and, Turkey Oak Q. cerris . The first generation of adult wasps to emerge in spring are all female, they lay their eggs in the young oak buds. The second generation of the life cycle sees sexually reproducing male and female wasps emerge from the galls, the female returns to lay eggs on the English Oak and the cycle begins again. The Acorn Gall wasp has only been known to be in Britain since the 1950's, having made its way north from Europe. The introduction of the Turkey Oak to Britain in the 1700's eventually facilitated the arrival of the wasp from Europe.
 |
| Plenty of things to paint at this time of year! |
Colours: Lower acorn, Gold Ochre and Burnt Sienna, built up in washes with a wash of Transparent Yellow applied on top. Highlights were left clear and a small amount of Cerulean Blue used to bring the highlight forward. A little dry brush work was used the build up the rich colour on the acorn. Acorn 'cap', Green gold, Indanthrene Blue and some Burnt Sienna on top for the indents.
Gall, Burnt Sienna and Raw Umber with Ultraviolet and Indanth Blue for the shadows.
Tuesday, 24 September 2013
No. 21, 30 day Challenge, Whitebeam Berries, unfinished
An unexpected event yesterday resulted in a couple of trips to the hospital! so I'm a bit behind with everything today.
I collected this little piece of Whitebeam with unripe berries outside a nursing home in Stalybridge, Gt Manchester on Sunday morning. These berries turn bright red but I quite like them at this stage.
Unfortunately I completely ran out of time to paint it today and I'm too tired now .....so here it is unfinished..... That's just how it goes sometimes.
 At one time Whitebeam was an important timber in Britain, being a fairly hard wood it was used to make parts in machinery before being replaced by iron. It later became a much planted roadside tree. It's a lovely tree with a distinctive light downy underside on the unusual coloured leaves.
Colours: Berries, Gold Ochre and Green Gold graded wash depending on the level of green or yellow in each berry. Highlights were left clear. I applied 3 washes. Then some detail using Raw Umber and Burnt Umber. I added a little Sap Green on the darker greens Would have continued to build up a bit more form using some dry brush but no time to do so.
Leaf , Burnt Sienna and Gold Ochre for the initial wash, several washes were requires with some Green Gold added. I used Cerulean Blue on the highlights and Ultraviolet and Indanthrene blue on the shadows. I used the the Ultraviolet to the Burnt Sienna for the recesses at the veins. Needs more tone but again no time.
Stem: Incorporated many of the same colours, first green gold and Burnt Umber, Followed by a wash of Burnt sienna in the richer coloured stems and shade the same as the leaf.
I collected this little piece of Whitebeam with unripe berries outside a nursing home in Stalybridge, Gt Manchester on Sunday morning. These berries turn bright red but I quite like them at this stage.
Unfortunately I completely ran out of time to paint it today and I'm too tired now .....so here it is unfinished..... That's just how it goes sometimes.

Colours: Berries, Gold Ochre and Green Gold graded wash depending on the level of green or yellow in each berry. Highlights were left clear. I applied 3 washes. Then some detail using Raw Umber and Burnt Umber. I added a little Sap Green on the darker greens Would have continued to build up a bit more form using some dry brush but no time to do so.
Leaf , Burnt Sienna and Gold Ochre for the initial wash, several washes were requires with some Green Gold added. I used Cerulean Blue on the highlights and Ultraviolet and Indanthrene blue on the shadows. I used the the Ultraviolet to the Burnt Sienna for the recesses at the veins. Needs more tone but again no time.
Stem: Incorporated many of the same colours, first green gold and Burnt Umber, Followed by a wash of Burnt sienna in the richer coloured stems and shade the same as the leaf.
Monday, 23 September 2013
No. 20, 30 Day Challenge, British Plum
Three quarters of the way through the Challenge! .... and it's back to the fruit. So here's one of my favourites, a very ripe plum.
.
 I don't think I've ever painted one of these plums before and overworked it a bit.
Colours: First wash, Aureolin and Scarlet Lake, leaving the main highlights clear.
Second wash a more 'red' mix adding Permanent Carmine.
Add some detail with spots and a third wash of Transparent Yellow and Permanent Carmine, followed by some dry brush with Permanent Carmine and Neutral Tint.
A little Cobalt Violet was used on the reflected light.
Finally, to add the bloom, I used Chinese White and Cerulean Blue.
.

Colours: First wash, Aureolin and Scarlet Lake, leaving the main highlights clear.
Second wash a more 'red' mix adding Permanent Carmine.
Add some detail with spots and a third wash of Transparent Yellow and Permanent Carmine, followed by some dry brush with Permanent Carmine and Neutral Tint.
A little Cobalt Violet was used on the reflected light.
Finally, to add the bloom, I used Chinese White and Cerulean Blue.
Sunday, 22 September 2013
No. 19, 30 Day Challenge, Dead Rose no. 2 on vellum
Decided to try the another one of my three dead roses. Not so happy with this one it felt a bit rushed but I do love this natural vellum and want to paint more on it.
I enjoyed painting the first rose and though trying another was a good move, however it doesn't follow that the experience and outcome will be the same.

The colours are much the same as yesterdays, the piece of vellum is a little darker and more golden. There's not an awful lot more to write about this piece, other than to say that the weekend goes much faster than the weekdays and time feels very short.
Friday, 20 September 2013
No. 18, 30 Day Challenge, Dead Rose on vellum
After the rushed rosebuds yesterday, I wanted to spend a bit more time on today's painting so allowed about half a day. I have some natural vellum and wanted to try it out, it's a lovely honey colour, shame this photograph doesn't really show the colour but you can see the veins in the skin. Vellum paintings take a long time normally so I decided to paint using a very limited palette using some of the earth colours in my palette, almost like an under-painting.... not just because time was limited but also because it suited the subject for today's painting.
The subject is a dead rose that I've had since my birthday last year. It was originally white and formed part of a beautiful bouquet....a very special birthday gift! It always seems a shame that cut flowers fade so soon, so I kept a few and they live on the kitchen windowsill now.....as a keepsake and are just as appealing to the eye even in this decayed state.

Colours: Raw Umber, Burnt Sienna, Gold Ochre and a tiny amount of Sepia. I also used a very light wash of Cerulean in areas on the left side ( light side) of the flower, to lift it.
I applied a very light wash of raw umber and burnt sienna, with some gold ochere on the left side. first, then modelled the suface using the appropriate dry brush technique. I added the veins using a needlepoint brush which was from the The Brushman, David Jackson. Thank you David! wonderful brush.
The subject is a dead rose that I've had since my birthday last year. It was originally white and formed part of a beautiful bouquet....a very special birthday gift! It always seems a shame that cut flowers fade so soon, so I kept a few and they live on the kitchen windowsill now.....as a keepsake and are just as appealing to the eye even in this decayed state.

 |
| Detail of dead rose showing the venation pattern, the viens in the rose suit the vellum well! |
I applied a very light wash of raw umber and burnt sienna, with some gold ochere on the left side. first, then modelled the suface using the appropriate dry brush technique. I added the veins using a needlepoint brush which was from the The Brushman, David Jackson. Thank you David! wonderful brush.
Thursday, 19 September 2013
No. 17, 30 Day Challenge, Rose Buds
There's still a few flowers left on the Rosa rugosa bushes locally and I had planned to paint a few of these rosebuds today but found I had no time at all with a few unexpected things coming up. So this was as far as I got. Not much of a photo either but I wanted to post something. So in the spirit of the challenge I did something....even though it's not finished and I'm not at all happy with it.
Will try to better tomorrow!
Colours: Flowers, Quinacridone Magenta, Permanent Magenta and Permanent Rose. Add some Winsor Violet for the shadows.
Will try to better tomorrow!
 |
| Very quick watercolour of rosebuds, very dark buds that look like they wont open. |
Colours: Flowers, Quinacridone Magenta, Permanent Magenta and Permanent Rose. Add some Winsor Violet for the shadows.
Wednesday, 18 September 2013
No. 16, 30 Day Challenge, Green Scots Pine Cone
Found some green pine cones last week....love the colour! Would have liked to paint it on the branch but yet again time was against me. It was a fairly small subject which was quite a relief at this point in the challenge. The pine cone, is an example of a Fibonacci sequence found in nature. Here being in two sets of spirals in the arrangement of the bracts, where one set goes in a clockwise direction and the other anticlockwise.
There's nothing magical about the number sequence, it's just the most efficient structure for growth. The Fibonacci number sequence is 0,1,1,2,3,5,8,13,21 etc., up to 233, where each number is the sum of the previous two numbers, it was first described by Italian mathematician Leonardo Pisano Bigollo (1170 - 1250) This simple growth pattern results in the spiral patterns found here in the pine cone, also in pineapples, sunflower centres, many succulents and other plants. The cone shown from the base in the image below shows the two spirals from their point of origin, in this case with 5 clockwise spirals and 8 anticlockwise spirals, in accordance with the Fibonacci numbers. Was a bit rushed to add the view from the base...could be better!
Colour: First wash a mix of Indanthrene Blue and Transparent Yellow. There after a Mix of Perylene Green and Transparent Yellow to gradually build up colour. Shadows Indanthrene plus Winsor Violet, Centre of bracts Raw Umber.....and a little bit of that Manganese Blue Hue on the highlights.
 |
| Green Pine cone and pine needles |
 |
| Plus the view from the base, showing the two Fibonacci spirals |
Colour: First wash a mix of Indanthrene Blue and Transparent Yellow. There after a Mix of Perylene Green and Transparent Yellow to gradually build up colour. Shadows Indanthrene plus Winsor Violet, Centre of bracts Raw Umber.....and a little bit of that Manganese Blue Hue on the highlights.
Tuesday, 17 September 2013
No. 15 Half Way Through the 30 Day Challnege, Honeysuckle Berries
Half way through the challenge and I found myself extremely short of time yesterday. Didn't manage to start painting until late last night. I don't really like painting at night and much prefer natural light at the moment. So this was a bit of a rush job and remains unfinished. I had wanted to do something else yesterday but decided it was unachievable in the time frame, so I collected this from my mum's garden yesterday while I was visiting to fix my dad's laptop! I think my heart just wasn't in it.
Honeysuckle fruits have a 'jewel' like quality which I tried to capture, there is a translucency in the vibrant reds but with dark shadows but I overworked it on the right hand. Not sure if this was because I was rushed or because of the bad light, anyway I decided to call it a day and abandon the unfinished piece. Normally if this happens I scrap the work and start again but that's not possible for this challenge. I always think if it's not going to plan I will always be able to spot the defects and think it's quicker to start over than try to fix.
Colours: Berries Scarlet Lake and Permanent Alizarin Crimson for the first wash, leaving the highlights clear. For shadows add very small amount of Indanthrene Blue. Then a wash of Quinacridone Red
Leaves: Transparent Yellow and Cobalt Blue Deep,
Leaf bronzing and stem, Permanent Alizarin Crimson and Burnt Umber.
A small amount of Manganese Blue Hue was used for the higlights on the berries and leaves.
Honeysuckle fruits have a 'jewel' like quality which I tried to capture, there is a translucency in the vibrant reds but with dark shadows but I overworked it on the right hand. Not sure if this was because I was rushed or because of the bad light, anyway I decided to call it a day and abandon the unfinished piece. Normally if this happens I scrap the work and start again but that's not possible for this challenge. I always think if it's not going to plan I will always be able to spot the defects and think it's quicker to start over than try to fix.
 |
| Honeysuckle berries from mums garden |
Leaves: Transparent Yellow and Cobalt Blue Deep,
Leaf bronzing and stem, Permanent Alizarin Crimson and Burnt Umber.
A small amount of Manganese Blue Hue was used for the higlights on the berries and leaves.
Sunday, 15 September 2013
No. 14, 30 Day Challenge. The Apple
This was a more time consuming painting but two weeks in and I'm definitely getting faster and more comfortable with painting every day!

I chose this very small apple for today's challenge, it's not the most glamorous of apples, slightly furry in appearance with very little shine but it was the only apple on the tree that could be reached. The leaves were in pretty poor condition and drying up fast but I prefer that look and it makes for more interesting leaf painting. Ideally it needs more finishing touches, particularly on the leaves but I'm out of time for today, having spent more than 3 hours on this piece. Funny beacause sometimes I spend two weeks thinking about what I 'should be painting' rather than actually getting on with something. During this challenge I've used that same amount of time to produce all of these mini artworks.......so the 30 day challenge can't be a bad thing and I believe that painting everyday really is the only way to improvement! despite the fact that I'm not putting much planning into each work, it's giving me new ideas for paintings and has become slightly addictive. Having said that the weekend has been a bit of a struggle because there tends to be more distractions but I just about managed to keep on top of it. Tomorrow... the half way point!
 |
| Apple detail to show colour layering and dry brush work |
Colours: Apple Green Gold for the initial wash leaving the highlights clear, Add some Cerulean around the highlights. Second wash add Cobalt Blue to the Green Gold for the green areas.
Add more blue to the green mix for the shade areas on the right and lower right hand side of the apple.
Raw Umber plus a little permanent rose for the detail markings
Add another wash of green gold leaving the highlights clear.
Dry brush on Permanent Rose mixed with Quinacridone red for the red markings.
Dry brush Raw Umber mixed with Burnt Umber for the brown markings. A small amount of French Ultramarine was added to the mix on the shade side.
Leaves Indanthrene Blue plus Green Gold add some neutral tint for shade areas. Burnt umber, in shade areas and gold ochre for markings. Cerulean on the highlights.
Painting no. 13 of the 30 day Challenge, Dried Rhododendron Flower
Not sure about this one, it's a rhododendron flower from a bud that I painted earlier this year. I kept it and it dried out in the cupboard along with all the other dried up bits of plants that seem to accumulate. It has pretty much maintained the colour, albeit lower in saturation. Was short of time again todays so it fitted the purpose and made an interesting subject by way of a change.
Colours: Dead Flower Permanent Rose and Ultramarine Green Shade, built up in layers of light washes, with varing degrees of bias towards either red or blue. These flowers are almost 'two- tone' in colour depending on how the light hits them, so I think that this appearance can only be achieved with this layering method and by using transparent colours. I also used some Cobalt Violet in areas and Manganese Blue Hue for the highlights. For the darker shades and detail I added neutral tint. For the dead areas I used burnt umber. Also Burnt Umber plus some Permanent Rose for the reproductive parts.
 |
| Dried rhododendron flower. |
 |
| The original Rhododendron painting, unfinished. |
Colours: Dead Flower Permanent Rose and Ultramarine Green Shade, built up in layers of light washes, with varing degrees of bias towards either red or blue. These flowers are almost 'two- tone' in colour depending on how the light hits them, so I think that this appearance can only be achieved with this layering method and by using transparent colours. I also used some Cobalt Violet in areas and Manganese Blue Hue for the highlights. For the darker shades and detail I added neutral tint. For the dead areas I used burnt umber. Also Burnt Umber plus some Permanent Rose for the reproductive parts.
Saturday, 14 September 2013
No. 12, 30 Day Challenge, More Rose Hips
Bit of a rush today....so a short post and quick painting. From the collection I found yesteday here's another rose hip, not sure what this one is. I like the long hanging stem as a composition and it seems to be a feature of the plant so kept this rather than breaking it nearer to the fruit.
Colours: Fruit: First wash, Transparent yellow + Quinacridone red to give and orange base, leaving the hoghlights clear, followed by a wash of Scarlet lake applied in the more vibrant red areas. I use Manganese Blue Hue around the highlights and cobalt violet on the areas of reflected light. Build up the darket reds adding Permanant Alizarin Crimson and mixed with a very small amount of Indanthrene Blue in the darlest areas. Quite a bit of layering in washes to get the different shades of oranges and reds followed by some dry brush work to finish off.
Stem: French Ultramarine Green Shade plus Transparent Yellow. I use more blue in the mix on the right hand side and more yellow on the left I add some blemishes to the fruit using the green mix plus some Burnt Sienna. Raw Umber and Burnt Sienna was used for the dead anthes and Sepia to paint the negative space between them and for fine line work.
 |
| Finished piece. |
 |
| Close up, to show variation in colour |
Colours: Fruit: First wash, Transparent yellow + Quinacridone red to give and orange base, leaving the hoghlights clear, followed by a wash of Scarlet lake applied in the more vibrant red areas. I use Manganese Blue Hue around the highlights and cobalt violet on the areas of reflected light. Build up the darket reds adding Permanant Alizarin Crimson and mixed with a very small amount of Indanthrene Blue in the darlest areas. Quite a bit of layering in washes to get the different shades of oranges and reds followed by some dry brush work to finish off.
Stem: French Ultramarine Green Shade plus Transparent Yellow. I use more blue in the mix on the right hand side and more yellow on the left I add some blemishes to the fruit using the green mix plus some Burnt Sienna. Raw Umber and Burnt Sienna was used for the dead anthes and Sepia to paint the negative space between them and for fine line work.
Friday, 13 September 2013
Day 11 of the 30 Day Challenge, Blackberries
I think it's fair to say that where I live isn't the most picturesque or inspiring of of places. Stoke on Trent or the 'Potteries' is a strange place with no heart to the City, it sprawls across 5 run down towns, littered with remnants of its former industrial heritage and demolition sites. Unfortunately it's yet another City undergoing haphazard 'regeneration', dictated by an ill-informed Council.
But even in a place like this it's surprising what you can sometimes find on the doorstep. I live on the outskirts of one of the 5 towns, Longton. It's just a few miles from where I was born, and I have to say that it's the most depressing of places and not really somewhere that you would venture out for a stroll.... but recently I've noticed ( while sitting in the usual traffic jams) that if you look around there are all sorts of bits and pieces of green space in this town, like stepping-stones for wildlife. Yesterday I ventured along a path that I'd spotted while stuck at yet another set of temporary traffic lights! it runs parallel with the main A50 road and towards the incinerator and the Britannia football stadium....sounds lovely doesn't it! But I found some great stuff there and the Council obviously did a good job with the planting in years gone by, with fruit trees, bushes and berries a plenty!
So I now have a haul of items sufficient to keep me going for at least another 10 days of the challenge! And the lesson here is.....stop putting off painting by using the excuse that there's nothing to paint....it's not true! there's always something to paint, you just haven't looked!
Here's my first effort from yesterdays find. The good old blackberry.
It started as a simple single fruit study ( below ) but felt like I hadn't done enough, so started adding more berries and some leaves in graphite. I tend to think this isn't a good approach and usually like to have a clear idea of the outcome at the outset but I'm bending my own rules for this Challenge because it's good to bend your own rules. Think I prefer it as it was in the simpler form, although the curl of tissue where it was pulled from the stem is quite nice..... and inflicted considerable pain!
Colours: Red berry: Transparent Yellow and small amount of Cobalt Blue Deep for the green
Quinacridone Red wash graded into the greener berries, and then as a wash the the remaining berries, remembering to leave all highlights clear. towards the left of the front berry I added Permanent Alizarin Crimson, where the berries are a cooler colour. I applied two washes and then used dry brush to model the form adding a small amount of Indanth Blue to the red for the shade red. I used cobalt deep and cobalt violet on the reflected light areas.
Blackberry: Indanth, blue and Permanet Alizarin Crimson with a tiny amount of cad yellow, I used different washes of the Indanth and Alizarin on top of the first wash tho show the blue or red bias in the berries. I used the same Cobalt Blue Deep and Cobalt Violet for the light as in the red berries.
Stalk and dried parts: French Ultra and trans yellow for the green. I added raw umber for the browns and hairs with some Permanent Rose and Indanth Blue added to make the darker brown. I used sepia for the darkest touches on the unpollinated dead flower anthers and filaments.
But even in a place like this it's surprising what you can sometimes find on the doorstep. I live on the outskirts of one of the 5 towns, Longton. It's just a few miles from where I was born, and I have to say that it's the most depressing of places and not really somewhere that you would venture out for a stroll.... but recently I've noticed ( while sitting in the usual traffic jams) that if you look around there are all sorts of bits and pieces of green space in this town, like stepping-stones for wildlife. Yesterday I ventured along a path that I'd spotted while stuck at yet another set of temporary traffic lights! it runs parallel with the main A50 road and towards the incinerator and the Britannia football stadium....sounds lovely doesn't it! But I found some great stuff there and the Council obviously did a good job with the planting in years gone by, with fruit trees, bushes and berries a plenty!
So I now have a haul of items sufficient to keep me going for at least another 10 days of the challenge! And the lesson here is.....stop putting off painting by using the excuse that there's nothing to paint....it's not true! there's always something to paint, you just haven't looked!
Here's my first effort from yesterdays find. The good old blackberry.
 |
| Finished piece, watercolour and graphite |
 |
| Single study first. |
 |
| Close up, a bit blurred because this is much larger than actual size but I added it so you can see the colours in more detail. |
Colours: Red berry: Transparent Yellow and small amount of Cobalt Blue Deep for the green
Quinacridone Red wash graded into the greener berries, and then as a wash the the remaining berries, remembering to leave all highlights clear. towards the left of the front berry I added Permanent Alizarin Crimson, where the berries are a cooler colour. I applied two washes and then used dry brush to model the form adding a small amount of Indanth Blue to the red for the shade red. I used cobalt deep and cobalt violet on the reflected light areas.
Blackberry: Indanth, blue and Permanet Alizarin Crimson with a tiny amount of cad yellow, I used different washes of the Indanth and Alizarin on top of the first wash tho show the blue or red bias in the berries. I used the same Cobalt Blue Deep and Cobalt Violet for the light as in the red berries.
Stalk and dried parts: French Ultra and trans yellow for the green. I added raw umber for the browns and hairs with some Permanent Rose and Indanth Blue added to make the darker brown. I used sepia for the darkest touches on the unpollinated dead flower anthers and filaments.
Thursday, 12 September 2013
No. 10, 30 Day Challenge, Twigs
Well this was a bit over ambitious and lacking in planning!...Day 10 and for some reason I decided to try something more elaborate with a few twigs and bits of bark collected from the local park.....not one of my best ideas but have to say that this process of painting a different subject everyday does get you thinking about new subjects and composition, not in a particularly good way in this case. But time was against me and I'd started with not enough planning, so I had to try to finish.... however it just wasn't possible!
 Colours: I'll come back to this later.....lots!

Tuesday, 10 September 2013
No. 9, 30 Day Challenge, Two Leaves from the Park
More decaying leaves from my local park today. I found them peeking through the leaf litter, so bright in colour I thought they were plastic or paper packaging from a distance! They are very small in size being less than 5cm in length. So thought I'd stretch myself a bit by painting two!
 Colours: First wash is a graded wash of naples yellow and permanent rose for the 'pink' areas, leaving the highlights clear. I just realised that permanent rose must be my most used colour!
Raw Umber and Trans Yellow on the lighter brown areas mixed with a small amount of cobalt to cool it down.
A little Manganese Blue Hue on the hightlights.
Build up in layers of Permanent Rose picking out the edge of the prominent veins.
Add some Indanthrene Blue to the Perm Rose for thee more puple hues then add neutral tint mix to this for the darkest areas. Finish off using some dry brush to accentuate the veins, leaf edges and blemishes and model the surface using the same colours to create more form. Finally added a bit of Burnt Sienna to lift some of the browns.....and that's it! ...until tomorrow.
No. 8 ,Week two of the 30 Day Challenge, Decaying Virburnum Leaf
Collected this leaf a few months ago in Longton Park, Staffordshire. Not sure of the species, maybe Virburnum rhytidophyllum. My favourite sort of colours and a nice surface texture.....perfect for painting in every way! completely dried out so hasn't changed since I found it. Would make a good vellum study but this one is on paper for speed.
Really pleased that so many of the botanical artists from the Botanical Artists Facebook Group are joining in with this challenge too!
Colours: Aureolin wash, lay it on fairly loosely leaving highlights clear.
Add a mix of Permanent Rose and Gold Ochre to the golden brown areas.
Add a mix of French Ultra and Winsor Lemon for the green areas
for the dark red/ brown edges Perylene Maroon and a little Permanent Rose mixed with Sepia.
Model the surface 'bumps' using dry brush using the same colours, plus a little neutral tint in the shade areas
Pick out the lines for the veins and deeper recesses using the same colours.
oh and a tiny bit of Cerulean on the highlights.
 |
| Decaying Virburnum leaf |
 |
| Close up, showing leaf surface painting technique |
Colours: Aureolin wash, lay it on fairly loosely leaving highlights clear.
Add a mix of Permanent Rose and Gold Ochre to the golden brown areas.
Add a mix of French Ultra and Winsor Lemon for the green areas
for the dark red/ brown edges Perylene Maroon and a little Permanent Rose mixed with Sepia.
Model the surface 'bumps' using dry brush using the same colours, plus a little neutral tint in the shade areas
Pick out the lines for the veins and deeper recesses using the same colours.
oh and a tiny bit of Cerulean on the highlights.
Sunday, 8 September 2013
Day 7, 30 Day Challenge. Hydrangea skeleton
I made it to a whole week! Following yesterday's shell I wanted to revert to something a little less labour intensive. Chose this hydrangea flower skeleton which was part of a whole flower-head found blowing around like tumbleweed in my back yard about month or so ago.
It's a very small effort, about 30 minutes worth today, which is a bit of relief compared to yeterdays slog. Very easy to paint, just paint in the main veins then the lateral veins and broken transparent tissue fragment beween .....might add a couple more flowers to it later if I feel enthusiastic.
Oh and I've noticed after only a week that my painting is speeding up......lets see if continues and also when I hit the wall with this challenge.
 Colours: Raw and burnt umber for the tissue with some French ultramarine in the mix for the cooler areas, sepia and burnt umber for the veins....lazy palette today. Never normally use sepia but it works ok for dark decaying material like this.
It's a very small effort, about 30 minutes worth today, which is a bit of relief compared to yeterdays slog. Very easy to paint, just paint in the main veins then the lateral veins and broken transparent tissue fragment beween .....might add a couple more flowers to it later if I feel enthusiastic.
Oh and I've noticed after only a week that my painting is speeding up......lets see if continues and also when I hit the wall with this challenge.

Day 6, 30 Day Challenge, The Shell
And now for something completely different! no. 6. The Shell. I always wanted to draw this shell, I've had it for 24 years and never got around to it. I first found it in the house we lived in when we moved to Gardenstown, Scotland in 1989. It was left there by the artist that lived in the house before me. I kept it all these years and it always sat in the windowsill wherever we moved to. When I moved back to England last year I left it behind but my daughter recently returned back home and brought it back as a study object for her current project at art college.....so it seemed worthy of drawing.
It was a bit ambitious to attempt it in such a short time frame because it's quite complicated and full of strange worm casts inside the shell. So I rushed it a little and couldn't finish it but I'll definitely draw it again when I have more time. Not a great photograph as it's late now and difficult to capture in poor light.

I used Faber Castell 9000 range from 2H to 6B
It was a bit ambitious to attempt it in such a short time frame because it's quite complicated and full of strange worm casts inside the shell. So I rushed it a little and couldn't finish it but I'll definitely draw it again when I have more time. Not a great photograph as it's late now and difficult to capture in poor light.

Saturday, 7 September 2013
Day 5, 30 Day Challenge, Douglas Fir cone
Not completed a tonal drawing for a while so switched to graphite for a change for my 5th subject . A slightly battered Douglas Fir cone with the bracts broken. I collected it earlier this year from Vimy Ridge. Completed in the morning but not too happy so added some more shade on the right side later in the day and think it's better now.
 I used Faber Castell 9000 series pencils on 140lb Fabriano Artistico (HP), used grades H, F, HB, 2B, 3B, 4B, 5B and 6B. I prefer the surface of watercolour paper for drawings rather than the smoother Bristol Board etc because it gives a softer appearance to the work.

Thursday, 5 September 2013
Painting number 4, 30 Day Challenge! Rose Hip
A rather shrivelled up rosehip, collected in Norfolk last week (see it looking a bit healthier towards the end of this post). I did a few rosehips over the last few days so I'm posting them too. Still want to do a less ripe one with some green on it. The first one I painted gave me the idea for this challenge!

 Colours for the first rosehip:
Fruit
First wash Aureolin, leaving highlights clear, drop in scarlet lake while it's still wet to create basic form.
Build up a couple more washes of the same.
Add permanent carmine and use dry brush technique to shade areas. This 'models' the surface.
Add Indath blue or neutral tint to the perm carmine and continue to dry brush
I also used cerulean blue around the highlights plus a tiny bit of cobalt violet for reflected light
Raw umber and neutral tint for the blemishes/spots
Green: cobalt plus transparent yellow adding a small amount of burnt umber on browner areas
Burnt umber plus neutral tint for anthers etc and for darker spots over the green . Chinese white for light hairs.
Stalk: Aureolin, scarlet lake ( dilute mix) green mix on lower edge and a small amount of raw umber and neutral tint on shade side.
 | ||
| Looking worse for wear now, a rather squat little dishevelled little rose hip! I painted this the other way up, as it should be on the plant but it looks wrong so I turned it upside down! A little red caterpillar crawled out of it followed by a little yellow one...bellies full of rosehip I think |
 |
| First attempt, this one has a bit more green at the top. |
 |
| Second attempt. Slightly lighter version. Close up of the one below, showing the colours and brush work in more detail |

 | |
| This is the shrivelled up one when it was young and pretending to be a tomato! |

Fruit
First wash Aureolin, leaving highlights clear, drop in scarlet lake while it's still wet to create basic form.
Build up a couple more washes of the same.
Add permanent carmine and use dry brush technique to shade areas. This 'models' the surface.
Add Indath blue or neutral tint to the perm carmine and continue to dry brush
I also used cerulean blue around the highlights plus a tiny bit of cobalt violet for reflected light
Raw umber and neutral tint for the blemishes/spots
Green: cobalt plus transparent yellow adding a small amount of burnt umber on browner areas
Burnt umber plus neutral tint for anthers etc and for darker spots over the green . Chinese white for light hairs.
Stalk: Aureolin, scarlet lake ( dilute mix) green mix on lower edge and a small amount of raw umber and neutral tint on shade side.
Wednesday, 4 September 2013
Day 3 of the 30 Day Challenge, Prunus
Day 3. Prunus spinosa collected during a lovely trip to Norfolk last week, August 28th. Managed to paint a tiny piece today. Would have liked to have done a more of the branch but at least I managed a mini study as part of the challenge....not the easiest thing to paint in a hurry because of the bloom.


 Colours: Fruit: Indanth blue + perm magenta
For the shade areas + neutral tint
add small amount of raw umber on the slightly green / brown areas.
Chinese white used for the bloom mixed with small amount of cobalt blue in the more blue areas.
 |
| From walk along the river Waveney, bursting with berries....I like this place! |


For the shade areas + neutral tint
add small amount of raw umber on the slightly green / brown areas.
Chinese white used for the bloom mixed with small amount of cobalt blue in the more blue areas.
30 Day Challenge. Day 2, More Maple Seeds
My second effort for the 30 day challenge. Yes it's another maple seed!....well more than one this time. Found in Longton, Staffs, on Mon 2nd Sept, during one of those mundane trips to the Docs.... when you stare at the pavement instead of looking where you are going! Watercolour, size 10.5 x 8.5 cm.
 I liked the colour in this, so moved it up the list of subjects to prioritise before the green colour turns to brown.
For anybody interested the colours used are:
First tea wash, leaving clear the highlights = raw umber + trans yellow
Lightly pick out the veins using = burnt umber + burnt sienna
Build up the colour using a graded wash of green ( trans yellow and cobalt blue) plus raw umber and gold ochre
Add stem ( burnt umber + neutral tint)
Continue to build up layers, picking out veins and detail with the stem colour)
Add tiny bit of permanent rose where their are some pink edges.
Wash of trans yellow over the top to pull it together.
I suppose I could have mixed these browns but I'm lazy and this is a 30 day challenge....will be happy just to get through it! trying to work to a 90 min max time for all pieces. Some will take more and some less.
Tuesday, 3 September 2013
New 30 Day Challenge, Found Natural Objects.
 |
| 30 day Challenge, Number 1. Maple seed..... yes I'm starting very small! |
What is the 30 Day Challenge all About? The 30 day challenge has grown in popularity of the last few years because apparently 30 really is the magic number!. It's thought to be just the right amount of time to make a positive change or to lose a bad habit. It's loosely based on patterns of natural biorhythms. I'm not sure how scientifically accurate this theory is but for many it seems to work and there are endless challenges that you can get involved with. So if I want to be more productive with my work this may be just what the Dr ordered.....provided I stick to it!
According to psychologist Dr Meredith Fuller, the odds of succeeding are better when it's a group activity. Here's my Challenge http://30daychallenges.net/challenges/info/1396 if anybody fancies it?
Will add as I progress.
Subscribe to:
Posts (Atom)


