
So here's a start -
A Bit About Drawing. No 1
Drawing from direct observation of an object, also known as objective drawing, is a core skill for any botanical artist, it underpins an accurate representation of any plant and should be practised regularly.
The way that we choose to represent an object through drawing can differ enormously between individuals, so the same object can be represented in a number of different ways. For example If you place an object on a table and ask a group of people to draw the same object, each drawing produced will be quite different..... in the position of the object, weight of line, tone, shading technique etc. I'm giving you a glimpse into my method but it's important to find what is right for you, however some basic rules will be common to most people.
To be able to represent a 3 dimensional object by line alone is the most basic type of drawing yet it is often most challenging and lays bare any technical errors. Being able to draw an object well requires good observation and technical ability but making a aesthetically pleasing drawing requires a greater knowledge. There are no shortcuts or magic formula's when it comes to drawing...it's hard work at times! Basic observational line drawings can be stand alone works or used as preparation or the first stage of a more detailed tonal drawings or paintings ( see beetroot drawing below) or even used as starting point for more creative works.
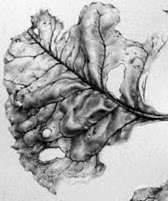 |
| Leaf detail from the drawing below |
 |
| Beetroot from 2010 |
 |
| A centaurea flower study x 2.5. Drawing is all about order and process. It requires a bit of discipline. Observation, clean lines and the corract range of tones from light to dark. |
Most importantly you have to learn to draw what your eye can actually see and ignore what you brain tries to tell you about what you 'know' about an object or 'think' you can see, you brain will try to fool you into making assumptions!
Some people are better than others at breaking things down visually and see a clearer picture from the outset, whereas others have to work harder to get there. Drawing what you actually see is hard and it takes practise to over-ride the assumptions made by the brain!
I find the best way forward is to adopt a systematic approach and start by breaking the subject down by size and shape; first by measuring and then by identifying the most simple of shapes within the subject - into squares, circles, ovals or triangles etc. My initial sketches tend to be fairly rough and I try to determine the shape or form of the object by making rough sketches - this allows me to see the 'whole' rather than the detail, which is an important starting point in any drawing, and, in creating the composition (which I will discuss at a later date). I like to think of these initial drawings as the skeleton on which to build the work. If the skeleton isn't right the drawing wont work.
Sometimes it's tempting to just start drawing, this works for some people, however without measurement and planning it is likely that you will build basic errors into the work, these errors will be amplified as the complexity of the work increases.
 |
| This is how I like to teach the process, not to spoon feed the student though, that's no use. The idea isn't to show a person how to draw a cherry so they can only draw cherries! the idea here is to 'take away' the 'process' - so that you can work out how to do it for yourself. |
Materials, Measuring and positioning
Basic Kit
Paper
I use HP watercolour paper for my drawings, usually Fabriano Artistico or Arches because I like the surface but any good quality drawing paper with a smooth surface will do, try to work on paper with a weight of around 140lb. For sketches use any good quality sketch paper, such as Daler Rowney Heavyweight Paper 135lb.
Pencils
Faber Castell 9000 series, range from 2H to 6B. Again any good quality drawing pencils.
Eraser
Putty rubber.
Ruler
A long ruler, approx 60cm.
Sharpener
Craft knife and fine sandpaper block.
Measuring and Positioning
Botanical subjects are usually drawn life size, so first of all I measure the total height and width of the plant specimen using a ruler. I also measure all the relevant parts e.g. stem length and width, distance between leaf shoots, leaf length and width, flower head width and height etc. take notes of these measurements in your sketch book.
 |
| 1. Measure overall size height and width, and, all parts. |
I then plot the outer boundary of the drawing. Measuring the outer boundary will help you to position the drawing evenly on the paper. For finished drawings I always try to leave a margin of at least 2.5 inches of white paper completely clear, to give the drawing space and to allow for mounting. White space is very important - a cramped drawing will not look good so planning is important. You can always cut down the final image but you can't add - so leave plenty of room.
For sketches it is also wise to work on decent sized paper to allow for notes and additional sketches.
If your subject is very tall you may want to cut the plant and rearrange to fit your paper. If you are unclear how to do this take a look at my painting of a foxglove. There are lots of examples if you look at old botanical works and herbals, field guides etc.
 |
| 2. Mark the outer boundary of the preparatory drawing, I have positioned the rose at an angle and measured the height width of the rose at this angle to lightly mark the outermost boundary for positioning on the paper. |
 | |
| I want to position the rose at a slightly more forward facing angle and observe the overall shape of the flowerhead. Try to look for patterns and shapes within the flower and the arrangement of petals. The petals form a Fibonacchi spiral arrangement ( more about this later). |
 |
| 3. A rough drawing of the basic structure and shapes is made by drawing the basic shape of the rose head in a rectangle, using the width and height measurements of the flower head. I start to draw some the basic shape of the flower which comprises a series of petals that form 'cup' shapes inside each other and which decrease in size towards the centre of the bloom. There are 5 visable layers of these cups at this angle. I also plot a centre line to ensure the centre of the flower remains in line with the stem. It's easy to get confused with a flower like a rose so breaking it down in this way helps you to keep contol of the petal arrangement. I use an H or HB pencil for this type of sketch but keep the lines very light so that they can easily be erased. |
 | |||||||
| 4. Adding the detail to the structure. Petals are easily added to the structural sketch. Try to keep lines continuous so that they are smooth, This is achieved by keeping contact between pencil and paper on flowing lines such as those on the stem. Lifting the pencil creates a jerky line so try to avoid this approach. I now have a a basic drawing and in this case have drawn over it using a fine liner so that there is no confusion over which lines I want to keep ( Also so you can see it! ). When I have completed the remaining leaves I will trace the drawing onto my paper for the final piece, making small adjustments if I feel they are necessary. I usually work by tracing my sketches onto the final paper in this way because it keeps the final drawing very clean. However sometimes I keep working on the sketch and use it as a final piece by erasing all of my working lines. |
That's it for now - a pretty rough and ready drawing!
NEXT UP I'll transfer the image to complete a line drawing and start to add some tone.


