 |
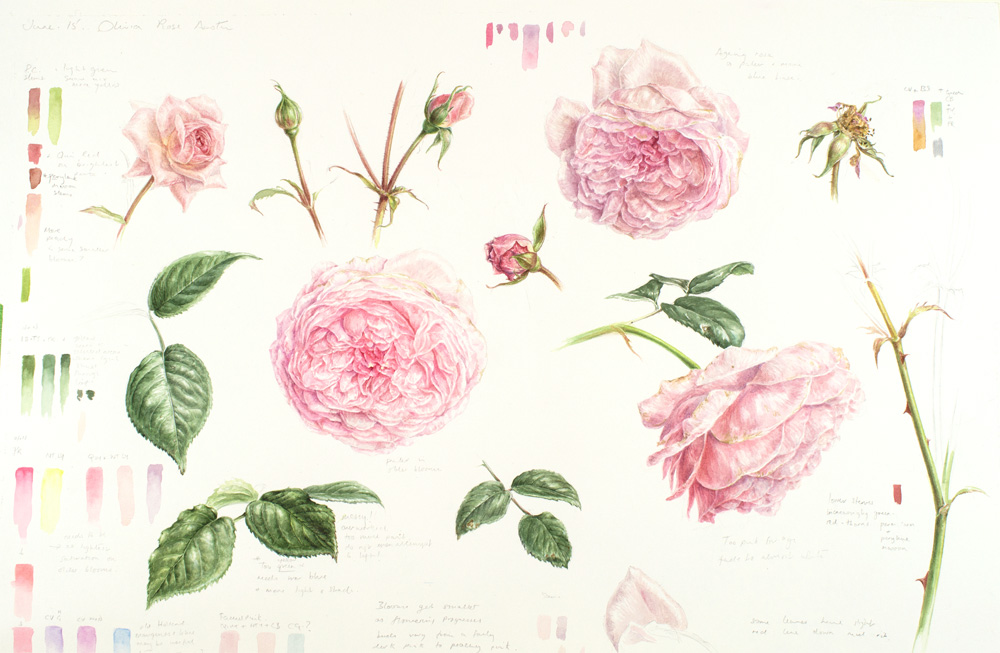
| First study page of Olivia Rose Austin |
 |
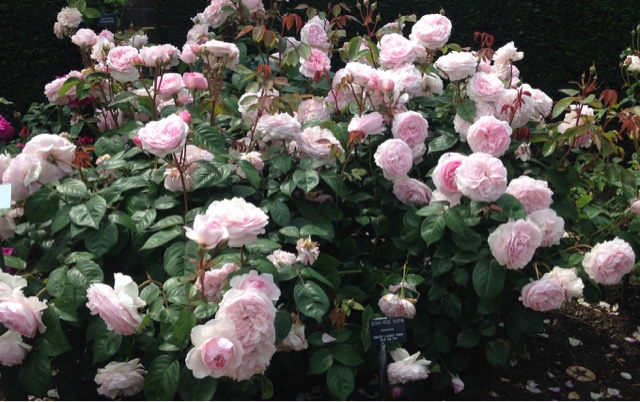
| Olivia Rose Austin in full bloom in late June at the David Austin Garden in Albrighton |
I couldn't write a post without a few photographs of the David Austin Garden, so here it is.....a feast of roses!
 |
| The Renaissance Garden |
I took well over 500 photographs and several videos on my iPhone. I returned again the following week for another look and although it was just one week later it's wasn't quite as spectacular. There is also a species garden and it was interesting to note how many bees were found in this area. Here's a short clip of typical of a very busy little bee. If the current paintings go well ( fingers crossed!) I'd like to paint some of the Scottish species roses next year.
I plan to paint the final works on kelmscott vellum and have a whole skin waiting on top of the wardrobe. But my initial approach is to complete sketchbook and then a number of study pages, the study page is the focus of this post. These studies are painted on A2 Fabriano Artistico watercolour paper ( I40lb HP) but a study page should be painted to suit the size and structure of a plant.
 |
| I don't plan a layout for a study page but place the elements randomly with fairly even spacing on the sheet. |
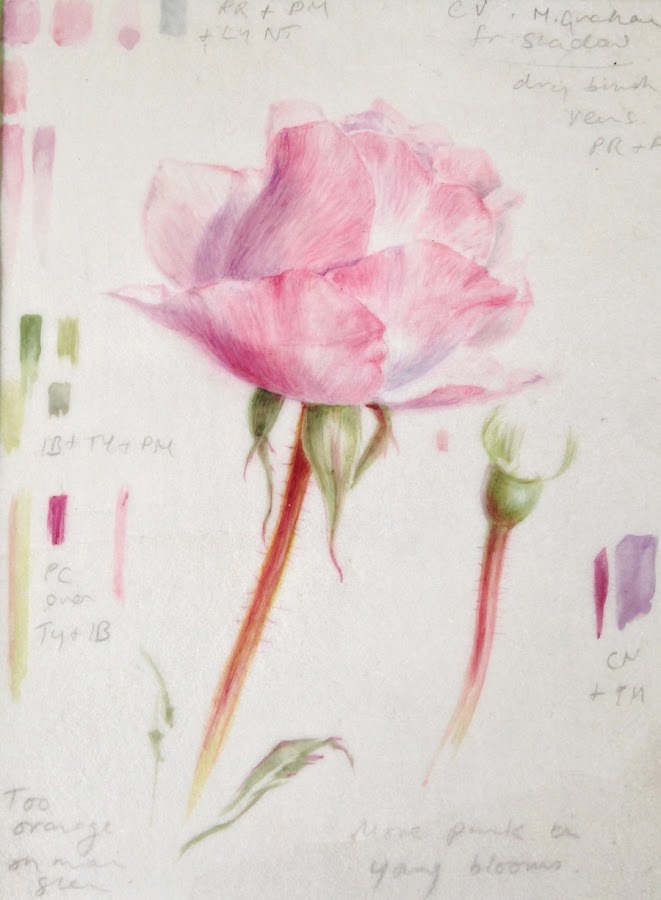
Because the final piece will be on vellum a number of small colour studies on off-cuts of vellum will be completed too, I do this because the colour will be different on vellum compared to paper. This study page approach allows me to get to grips with the subject and stimulates ideas for a composition. It's not painted in great detail and probably takes 2 or 3 days to complete. But I don't set a limit...it takes however long it takes. Most importantly though it enables me to get to know the subject and to understand the character of a plant, such as the growth habit, and in this case the changing morphological features and colours of the blooms.
Painting study pages is particularly important to me especially for a plant that I'm less familiar with. It's similar how a portrait artist needs to capture the character of a sitter, so the botanical artist must capture the particular character of a plant. I use this approach with all of my own work and all of my students are 'forced' to do it too. Those student who really commit to study page work, instead of skipping over it, seem to get the best results in the long term.
Painting study pages is particularly important to me especially for a plant that I'm less familiar with. It's similar how a portrait artist needs to capture the character of a sitter, so the botanical artist must capture the particular character of a plant. I use this approach with all of my own work and all of my students are 'forced' to do it too. Those student who really commit to study page work, instead of skipping over it, seem to get the best results in the long term.
 |
| Detail from page 1 of the study: Different stages of flowering, with faded older blooms, spent flower and bud. |
How to tackle a complex form
A rose of this type has a complex structure of many petals, after making some initial sketches I developed a reasonable understanding of the petal arrangement. I decided after putting in a feint outline in, that it was easier to sketch directly with watercolour. Then working from the outside to the center seemed to work ok, but keeping careful track. The lack of pencil helped me to keep it very clean and avoided any erasing. I only ever draw in very feint outlines use an eraser as little as possible - even light use can damage the paper surface. The washes need to be very light and carefully layered in a pale flower and detail is added with dry brush.
A rose of this type has a complex structure of many petals, after making some initial sketches I developed a reasonable understanding of the petal arrangement. I decided after putting in a feint outline in, that it was easier to sketch directly with watercolour. Then working from the outside to the center seemed to work ok, but keeping careful track. The lack of pencil helped me to keep it very clean and avoided any erasing. I only ever draw in very feint outlines use an eraser as little as possible - even light use can damage the paper surface. The washes need to be very light and carefully layered in a pale flower and detail is added with dry brush.
 |
| Gradually work into the centre building up the colour |
A confusing aspect of rose paintings is the change in the flower, they expand from a fairly simple bud and end up with a mass of petals. The colour changes quite dramatically too, so I painted the rose at different stages of maturity.
The leaves are quite a challenge with roses and of course any study needs a number of leaf studies. I have a few simple ones on this sheet but will complete more before proceeding with the painting.
I also did some research on other paintings of roses, from the obvious Redoute paintings to some contemporary painters. One of my favourite paintings of a rose is Martin Allen's beautiful single pink rose, also Kate Nessler's roses on vellum are old favourites of mine.
Munstead Wood
I wanted to capture all of the roses and they were all flowering together, so decided to complete the study pages for all first. Munstead wood is an English old rose hybrid and very different rose from Olivia with its rich dark wine and magenta coloured blooms. It's another beautiful fragrant rose and reminds me of childhood days spent collecting rose petals from my grandmothers garden.
I've a little more work to do on the study pages and will then move on to the composition, so will continue with this post at a later date to describe the process of composition. Thereafter the final painting on vellum will begin. Hopefully I can complete it this year while the roses are still flowering. If not I prefer to wait until the following year when the plants flower again. I could continue from photographs but only do this if I absolutely have to.
Munstead Wood
I wanted to capture all of the roses and they were all flowering together, so decided to complete the study pages for all first. Munstead wood is an English old rose hybrid and very different rose from Olivia with its rich dark wine and magenta coloured blooms. It's another beautiful fragrant rose and reminds me of childhood days spent collecting rose petals from my grandmothers garden.
 |
| Munstead wood study page underway. A very dark flower which changes colour from a crimson bud to a deep magenta or burgundy flower. |
 |
| The open bloom has many petals and appears two-tone in colour as it changes. |
One thing I have noticed is that painting roses is a messy business! All of a sudden the petals drop on mass! they fall into the water and on to the palette, resulting in this rather nice effect!


