Wednesday 30 December 2015

Back to Drawing, Bindweed

Drawing is a perfect activity for the short dark winter days here in the UK. I've written a few posts on the subject, this one is a about my latest work which involves a few different techniques. I've put together a short sped up video to show some of the techniques used.


The subject of the work is Bindweed, Calystegia septum, also known as Hedge Bindweed or Trumpet Vine, it is a member of  the Convolulaceae family, which includes Morning Glory. A very common plant throughout Europe it is considered a nuisance by many gardeners due to is dominant climbing habit. However this feature appeals to me as it scrambles over other plants smothering them and creating a complex web of overlapping intertwined vines, this makes it quite a challenging subject.
In the video above you can see how I approach the leaves and background. The drawing is created using the continuous tone technique, which requires no obvious outline be shown. Thus the initial line drawing blends into the tonal work using continuous tone technique and different grades of pencil from 2H to 8B are used to create the tonal values. I start with the harder grades of mostly Faber Castell 9000 pencils, i.e. H grade pencil to lay a foundation on the leaves and gradually build up the layers and depth using increasingly softer grades, up to a 4B for leaves. You will also notice that I use a soft brush to constantly remove any debris, if you don't do this you may end up with dark flecks from small specks of graphite dust and from any erasing.

photograph od a leaf drawing
Laying the initial foundation for the back of a leaf using harder grades H - B in this case, working from light to dark
 For the lighter flowers I start with a 2H and for the dark background I add a layer of continuous tone using a 5B. Thereafter I smooth this using a paper stomp, this serves to remove the graininess. I then go over the background again with a 6B. I also use an 8B for the very darkest touches. A Tombow retractable eraser is used to take out a few fine lines, using it as a drawing tool rather than an eraser of mistakes. Creating the correct depth of tone is all about using the appropriate grade of pencil. Always remember that to achieve the darker tones you should never apply more pressure but should instead change to a softer grade of pencil to go darker.


photograph of bindwwed flowers
I wanted to capture the depth of tangled stems and took many photographs for reference

I'm working from photographs having started this piece in August 2014 but also made sketches and took many photographs as long ago as summer 2013 during a trip to Germany. I don't normally work from photographs but In this case I make an exception for two reasons: 1.I'm very familiar with this plant having painted it on numerous occasions 2. It's easier to complete black and white studies from photographs than it is to do colour work - simply because there are no colour matching issues which requires working from life rather than photographs.

First stages of drawing on the easel
Started last year with the initial outline and a few leaves but  I abandoned the job because of other work commitments. Note that I use tracing paper to protect the work and keep a piece under my hand so as not to smudge the pencil
Dried Bindweed vine photograph
Some saved dead stems are useful to observe the habit

I gradually build up the image and have a rough drawing of the whole piece which is A1 in size ( on Arches satine 140lb). However along the way I add leaves and move a few things around. The beauty of such a dark drawing is that there is scope for change. I see this piece as very much experimental, if it works all well and good but if not at least i learned something from it.

This is where I'm up to with the work, obviously there is a long way to go and this represents about one third of the overall piece.
Worki in progress photograph of bindweed drawing
This is the progress to date! yes it's a long term project with lots of layers of graphite.
Will keep you posted on the progress. It will be put away again for a few weeks while I concentrate on teaching and other work.

If you want to know more about drawing posts on this site - just use the 'search' facility on the right  to type in 'drawing'.

This is my last post for 2015. I'll be back with a review of the year early next year. 

Monday 21 December 2015

Social Media and the Botanical Artist

I'm a big fan of using technology, social media and any pretty much any digital platform for sharing my artwork and information with like-minded people. The way we promote our work and communicate as artists has changed dramatically over the last 10 years and the priority has to be to get the work out there for people to see! I have to admit to muddling through with technology, but find most social networking services are very easy to use and they are free .....so that's good enough for me! This post is about some of the online services that I use, plus information on the direct benefits of online networking along with a few reasons why I consider using social media to an essential part of the online toolkit.

Instagram is a photo and video sharing service which allows us to upload photographs from a mobile device, we can reach people who might be interested in the posts by using the #. Posts can be shared with Facebook, Twitter, Flickr and Tumblr. I post a mix of personal images and my work because what I do in my spare time generally relates to much of my work and people seem to want to know about the artist as much as they want to view the work. With Instagram you can view the posts on a laptops but is only fully functional on mobile devices. I'm currently uploading a painting everyday under the #postapaintingeveryday. The idea being that I can share work completed over the past few years. Click to view.
I'm not suggesting that the online presence will be a miracle solution to all of your communication needs as an artist but it should be part of what you do on a day-to-day basis to promote your work, bear in mind that you do have to work at it - producing and writing about regular artwork and writing good content. The advantage is that with mobile technology much of the input can be done 'on the move' during what might otherwise be 'down-time'.

My online presence:
Two web sites, one for teaching and the other for my artwork, which should be kept up to date and be mobile friendly! websites can be promoted via social media
This Blog - I try to write regular posts with interesting and useful content
A Facebook Page which I sync with Network Blogs, Instagram, Twitter, Google Plus, LinkedIn
An Etsy Shop
Private Facebook Groups for teaching
A YouTube account for videos, mostly private for teaching.
....and any other useful means of sharing, including pages on other websites for societies which I'm a member of, such as ASBA and the SBA etc.

Sounds like a lot but it actually takes relatively little time to manage. It's the content that takes time not the management.

Facebook Page
A Facebook Page can be used to promote your work as well as for sharing Blog and Instagram posts, it can be synced to reduce the workload. Posts can be wide reaching and you can use the 'Insights'  facility to find out the reach of posts but more importantly to see what interests your followers. Click to view.

The main things to keep in mind is that it's important to know why you are using these services and to identify who you are trying to reach....so use your online presence with a purpose.

Website for my work, 'Profile' page. This of course isn't free but the cost are small. I'm currently overhauling it to make it mobile friendly. More people access the web via mobile devices these days, so that's an important consideration. For me the website is the reference point for clients, it has my biography, exhibitions, work history and awards as well as a showcase for my work. I also provide links to my teaching site Facebook page and Blog. So that all are connected. Click to view
I built a basic website over 10 years ago and started this Blog about 7 or 8 years ago. Over time the importance and role of both has changed. There is no doubt that both are more effective if used in conjunction with social media. I'm currently overhauling my website but these days it yields less communication than the Blog and Social media but is still necessary as a point of reference for clients.
 
I'm always slightly confused when people voice so many concerns regarding Social Media, personally I believe the benefits far outweigh any costs, often people raise concerns regarding copyright and having work stolen ... actually that can happen anyway and as far as I'm concerned the risk is minimal. I just keep image resolution low and never splatter my name and copyright symbols over the images because it looks bad in a business that's essentially based on visuals.

Five Good Reasons why Artists should use Social Networking
1. Easy to use - Anybody can set up a Facebook page it's very easy to add a page, also Twitter or Instagram are incredibly simple, all are excellent networking tools. To be most effective make sure that you link with a blog and/or website, and share with other services. Keep your networking relevant, remember to post interesting information for the benefit of your followers.

2. Reach a wide audience with your work - Social networking really does get your work to a wide group of people, if I write a blog post which I sync with my Facebook Page via Networked Blogs it also automatically posts Twitter and I sometimes add it to LinkedIn too. For example a blog post networked on my Facebook Page about my sketchbook reached over 4,000 people on Facebook alone,  the blog has hundreds of hits per day, which then declines over time, which is why it's important to write regular posts ...the main point to consider is that your content should be interesting and not just self promotion or images of finished work with little written content. Think about whether you would like to read it. I compare the statistics using Statcounter on each site and there is no doubt that by linking social networking with blogs and websites the traffic has significantly increased to both.

3. Make new contacts - Facebook has to be the best of all the networking tools. I have met many artists in person and had numerous opportunities through Facebook. Several years ago I became involved  as an admin for a Botanical Artists Group, which now has around 4,500 members! From this group several other other self help art groups and projects emerged. It's unlikely that I would have met many of these artists without the groups. I've also made some very good friends and become involved with several projects such as the Nature Sketchbook Exchange.

4. Benefits outweigh problems - Perhaps you are concerned about spending too long on social media but learn to manage the time, recognise the benefits, manage you feeds and target effectively. If used correctly it's a useful tool which creates opportunities. Considering the time spent it is by far the most economical way of getting work to a wide geographic audience.

5. It can create opportunities - You can market your work successfully for free and as a consequence can even sell work through various avenues. If you're not convinced here's a few examples of some direct benefits which have to me from my involvement with Social Media: I have been invited to invited to be part of the Royal Botanic Garden Florilegium Project, which means I'll be exhibiting there in 2016 and will have work in a beautiful publication, I've had several large commissions through companies who have found my work through Google searches (you need to use tags effectively and make sure that your website ranks well on Google but that's another post) and one commission for  a Boots range came via Facebook messenger! I was featured in Scottish Home & Interiors and was  invited to write an two page spread for the ASBA journal.

A feature in Scotish Homes & Interiors came from my website

My teaching online teaching practice has also expanded and I have a busy schedule for the year up ahead. Most recently I've been invited to run workshops in the USA as well as closer to home for two botanical art societies. None of these opportunities would have occurred without an online presence or social media.

Article in the ASBA Journal, June 2015. Resulted from my Blog post on the project, which also emerged via social media.

This is just a brief overview of how I use my web presence to communicate art, hopefully it's of some interest. There are lots of technical articles online which tell you how to do it. This is my own experience as a user and I know I could and probably should do more but the bottom line is that  get out what you put in.

Tuesday 1 December 2015

Sketchbook Travels no. 1 Australia

For almost 20 years I didn't travel abroad at all, this year I made up for it and ventured to the southern hemisphere for the first time. In October I was fortunate enough to travel to Western Australia and Indonesia, naturally the sketchbook came with me. It was well worth the long journey and the plants in Australia are stunning. I didn't sketch as much as I would have liked to but here a few pages of sketchbook studies from the trip. Can't wait to go back next year and spend more time there.
Swainsona formosa sketchpage
Sturt's Desert Pea, Swainsona formosa, A stunning little plant and the national emblem of Southern Australia. Had to include this one even though it's such a scruffy page! Would love to go back to make a 'proper' painting of it. Being from the pea family (Fabaceae), it reminded me very much of the jade vine flowers, but has this wonderful dark shiny 'bulbous' center.

After arriving in Bali for a few days I the made a short visit to Australia. While in Perth I visited King's Park and Botanic Garden, which was wonderful. It was great to see so many plants in real life that I've only ever seen in other artists' work or in photographs.
Australian native plants, sturt's pea and native cornflower
Sturt's pea can be found growing amongst the colourful wildflowers at the garden, here Brunonia australis, the native cornflower grows in the dry sandy soil. 
King's Botanic garden was quite a climb in the heat but I was met the incredible view across Perth.

View of Perth from Kings Botanic Garden
The beautiful blue skies of Perth from Kings Park Botanic Garden
 The sky was the most amazing blue, with the curious looking Baob trees and Eucalyptus flowers in abundance throughout the gardens.

Baob tree with view of Perth
Baob tree Andnsonia gregorii, overlooking the coast. The enlarged trunk is an adaptation to drought and enables the storage of large amounts of water.

 Plant life in Australia is very diverse, with over 20,000 vascular plants but the flora really is very different, with unique adaptations to drought and fire shaped by continental drift and climate change since the Cretaceous period. A favourite was Eucalyptus rhodantha, which I managed to draw.

Eucalyptus formosa sketchbook pages
Eucalyptus rhodantha, ' Rose Mallee' an endangerd plant from Westen Australia, has beautiful silver leathery leaves. Flowers are usually red but the form illustrated is a paler form.

Eucalyptus formosa sketchbook study page detail
When time is short - skip trying to paint the flower and make colour notes for reference instead. I love the little 'hats' which pop off this flower to reveal the multiple stamens.
Eucalyptus formosa photograph of red form
The more usual red  form Eucalyptus rhodantha
I chose two sketchbooks to take with me, the usual Stillman & Birn Zeta series hardback, with its heavyweight paper and a lovely brown leather journal with hand made natural coloured paper, by Gusti Leder. This German company is better know for their vegetable dyed leather bags etc. I have to say that the paper isn't as good as the Stillman & Birn but it's fine for sketching and note making and surprisingly I found that it takes washes better than expected. However it won't take much erasing or any overworking with watercolour but was good enough for my needs. If it goes wrong, best just to move on and sketch or paint the subject again, sketchbooks aren't supposed to be perfect...mine certainly isn't! 'Sketchbooking' is one of my favourite activities and I love the evolving layout on the page as it develops. I recently started a new course on just this subject and have a group of new students embarking on their personal sketchbook journeys. You can look at work by students on the blog for the coursework

Gusti Leder journal image
Gusti Leder Journal

I packed my normal watercolour box of W & N pans and a pencil roll with just a couple of brushes, Winsor & Newton series 7 miniatures, size 1 and 4, and Faber Castell 9000 pencils, grades 2H - 6B. Although with the Gusti sketchbook, found I couldn't use anything harder than a HB.

There were so many wonderful plants to illustrate: Banksia, Kangaroo paws, Bottlebrush and many more but sadly not enough time for all and after just 3 days in Perth I moved onto a new adventure in Indonesia.
I was sorry not to have more time to meet up with other artists and of course to paint and draw more, next year I shall return and hopefully stay longer to see more of this beautiful country when I shall run some botanical art classes, visiting New Zealand too.

View of Perth from Pan Pacific Hotel, sunset
Goodnight Australia until next time
Will write a post on the Indonesian sketchbooks studies at a later date....a very different experience doesn't belong in the same post

Friday 20 November 2015

Blackberries on Natural and Kelmscott Vellum

A few weeks ago a deadline loomed, this painting on natural vellum had to be completed before I left home on my travels to the other side of the world. The subject, blackberries, is a great one, simply  because they grow in such abundance, being available over a long period from around end of August until November, and they are beautiful! For me they grow within easy reach - just outside my window and down the lane where I live.
painting of blackberries on vellum
A detail from the painting on natural vellum reveals the dark hair follicles, which are characteristic of a calf skin taken during the cold winter months. The finish is also softer on this vellum when compared to Kelmscott vellum.

finished painting of blackberries on vellum
Almost finished! you can see the colour and venation in the skin as well as the variation across the skin. I tried to use the veins sympathetically with the composition and could probably have added more, however the clock was ticking and the work was posted on the morning I left for Indonesia! Apologies for the slightly poor photo I didn't have time so took this on an iPhone.
This piece of vellum is cut from a winter calf skin, it presented a few new challenges, most of which I haven't encountered before. The surface of natural vellum has dark hair follicles
and stronger venation also it accepts paint differently across the surface. In some area it seemed to absorb the paint and in others it repelled it due to the oils. The latter problem is resolved by a light rubbing with pumice, which I tie in a bag made from old ladies tights!

preparing vellum for painting by rubbing with pumice
Preparing a piece of vellum with fine grade pumice and French chalk fine
 It's also more difficult to achieve shiny highlights on natural vellum but I wanted to avoid the use of any titanium white or gouache, which I think would spoil it in this particular case. The addition of opaque white paint, traditionally known as body colour can work on some subjects but it should not, in my opinion, ever be used as a substitute substitute for poor maintenance of highlights on fruit or leaves but can work for bloom, flower detail and hairs.
In addition to the natural vellum painting I had previously made a smaller study on Kelmscott vellum which is easier to work on, it's also easier to achieve that desired shine but nevertheless I quite liked the softer finish on natural vellum......a different look but still appealing.

watercolour of blackberries on Kelmscott vellum
A small study  of the fruits on Kelmscott vellum, a much easier surface to paint on because it has a chalk wash which accepts the paint more readily

detail from watercolour of blackberries on Kelmscott vellum
A detail from the Kelmscott study shows that it's easier to achieve sharper edges and shine when compared to natural vellum, which gives a softer slightly 'diffused; finish.

There's another story behind the Blackberries on natural vellum! It had previously been completely ruined by me, or so I though, when experimenting with mounting vellum on different surfaces this piece had gone very wrong and looked like this! It was bent and crumpled but I was determined to rescue it. Read about how to mount it here in a previous post
damaged vellum
A disaster had happened when I tried an early experiment mounting the vellum, it buckled and resisted the glue so I had to remove it leaving this mess. I rescued it by soaking it for about 10 minutes before remounting using a method that I now know works, I used Ampersand conservation board and rabbit skin glues. It was completely smooth after mounting onto board but the board did bend ever so slightly. 

I don't consider myself to be a fruit painter but blackberries are a bit of an old favourite, one of my very first paintings was a blackberry and bindweed, which my mum still has. Both grow in the lane where I live and I love the intertwining nature.
blackeberries photograph from artist locality
Blackberries of varying stages of ripeness fill the lane near my home, mid August and there are still a few fruit in mid November. The colours are a gift to the botanical artist.

This year I've also painted another study of blackberries, this one in my sketchbook alongside bindweed...... I never tire of blackberries!
Sketchbook painting of blackberies and bindweed
Sketchbook entry, featuring blackberries and bindweed. I used this a a demonstration video on my  Creating a Sketchbook course

On the subject of  fruit, I heard this week that another fruit project completed earlier this year has finally made it into the shops. This was a series of illustrations for Method + Standard fruit vodka; strawberries, raspberries, apples and baby cornstalk were illustrated for this project, it was another tight deadline of around two months for all drafts and completed artwork. I've worked on a lot of labelling illustrations over the years, and this was a really lovely project to work on but very different from a typical botanical painting. The spacing and text layout positions place significant restrictions on the composition. The images have to work around the text and wrap around the bottle so only just peeping on to the front. This is tricky given the shapes, and, they also have to work as paintings and be used in other contexts for marketing, so two or three drafts are usually required to get it just right. Here's an composite image from the company posted on Instagram however due to copyright restrictions I can't post images of the product but the full the outcome can be seen at Method + Standard Fruit Vodka
I'm very happy with the outcome and worked with a lovely design company on this project, you can see more of the packaging here in this article

Composite image of illustrations courtesy of Method + Standard

I've now caught up with the old blog posts so will post a blog on the sketchbook travels to Australia and Indonesia next week.

Sunday 15 November 2015

Photographing and Editing Botanical Artwork, Part 1

Being able to share work digitally is important for an artist, whether on websites, blogs, social media or for exhibition submission the quality of the image should always be good. However photographing botanical artwork is notoriously difficult and can yield some pretty poor results, with loss of fine detail and grey uneven backgrounds. Even with the best photo editing software - a bad photo will always be a bad photo. We can of course always get a professional to do it but it's pretty costly so that means getting to grips with the camera.  I'm definitely no photographer but have recently found that with reasonably small investment and some perseverance it is possible to take fairly clean sharp photographs which are certainly good enough for recording my work. They may be of some use apologies for the 'wordiness'!

photographing botanical artwork
Photographing artwork in my small work space. Two softbox lamps, a DSLR entry level camera, tripod and a vertical surface to support the work does the job! You will also need some basic editing software, I use Photoshop Elements 13


Print Quality
This post is not about print quality images but discusses digital images only. If I need images photographing or scanning for a print always use a professional with a good colour correction is service. Computer monitors are not generally calibrated for viewing print so what you see on screen differs from what comes out of the printer, and home printers and scanners are not up to a professional standard job - so my advice is get a pro to do it! Make sure that they are a member of the Fine Art Guild if you are in the UK.

Scan or Photograph
Personally I prefer photographs for capturing images at home. I have found most scanners tat I have used to be 'lossy' at the top and bottom end and do not give a good enough impression of your work, scanning work on vellum or very fine work is virtually impossible on a home scanner.

Digital Image Submissions for Exhibitions or Web Quality Images
These days most exhibition submissions are initially sent online, this can save a lot of time and money but it is vital to have accurate images of your work. Images requirements usually have specific dimensions or should be the same as the original in dimension and a minimum of 300 dpi. They tend to be very large files e.g. 10 MB or more, so check that your email is capable of sending large files there are other ways of sending these large files, such as Dropbox. Sending a poor quality image is likely to result in automatic rejection. I tend to use a professional service for some jobs but find that I can now actually photograph high resolution images myself with a little effort.
Web based images do not need to be of the same quality but the initial photograph should still be of the same high quality. Web images are sized to 72 dpi and the dimensions are much smaller too, say a 400 x 500 pixels image for a web page entry will do. Keeping images as small file sizes means that they load quicker and there is less chance of your image being printed out....at 72dpi the image looks good on screen but is low resolution for print.
It's worth spending some time to get it right - after all it's just part of the job. A photograph taken under different conditions can give totally misleading representation of your work, as shown below.

Jade vine painting photograph comparison
On the left: This is the first photograph I attempted using the new lamps, although it still needed a little editing, it had a slight yellow cast and darker at the top but it's clear to see how much better it is than the dreadful photo on the right, The photograph was a RAW file was taken using the set up and equipment described in this post and edited using Photoshop Elements, it was saved as a JPEG here, I have a life size 300 dpi version a web sized 72 dpi version ( shown here ). On the right a poor quality photograph taken in uneven natural day light on a dull day ( admittedly an extreme example!). It's easy to see the difference, the image is grainy, grey/blue and and has uneven light, the colour is completely wrong! It is possible to take reasonable images in natural daylight but in general they are not up to standard. I tried to edit the image but it was a lost cause. The left hand image also maintains the natural colour of the paper unlike many 'Photo-shopped' images which have an unnatural white background yet the image itself is darker then it should be so has a hard edge compared to the original.An example of the stark 'over-photoshopped' image below, close inspection will reveal small missing bits and ragged edges.

Unnatural! Photograph taken in natural light on a tripod. The original was too dark so I attempted to edit it in Photoshop. The result is completely inaccurate colour and hard edges cause by using the Photoshop Magic Wand facility to grab the image and clean the background, this always leaves the image too dark and bold compared to the original, also because botanical work has some soft edges it can leave white gaps! It's a complete misrepresentation of the work. Scroll to the bottom of the post for the final image.

Equipment  and Software for Photographing Work
Doesn't have to cost the earth but but you will have to spend something. You will also need photo editing programme. Don't be scared of  Photo editing because you only need to know a few moves, such as image size, crop and editing such as colour and levels. I'll deal with the editing in a separate post.

editing painting images in photoshop
Using Photoshop Elements to edit your images isn't so difficult if you have a decent photograph to start with, I use only a few functions, Edit ( for cropping) Image ( for sizing) and Enhance ( for colours and levels). These functions will do most of the work

So what to buy and how much will it cost? ( assuming that you have a computer)
A decent DSLR camera - this can cost a lot but an entry level camera is good enough e.g. Nikon or Canon. I use the Nikon D3200 or Canon 100D ( my daughters) , cost about £350 -£400  I also have an older Sony and they're all good enough to do the job. 

Tripod -  £50 plus. Obviously the more you spend the better in terms of stability 

Two soft box lamps for diffused lighting - £60 - £100
softbox lamp
Soft Box lamp - a cover goes over the front and diffuses the light.It folds away into a bag for storage. The large bulbs are 5500K ( Kelvins)  which simulates natural white daylight. Lower K bulbs give a yellow light and higher K bulbs a blue light. They also have a CRI or colour rendering index of over 90 which is essential for accurate colour.

Photographic grey card- not essential but can be handy 

Memory card for the camera for transferring images - you will need a decent sized card as the files are large, such as the compact flash card, San Disk I use a 64 GB or 128GB card, cost around £20 to £40. Check compatibility with your camera, some only take smaller cards.

128 gb memory card

Software, Photoshop Elements 13 for editing, cleaning and sizing the image  - the latest version is 13 but previous versions will do the same this cost approx £85 as a bundle with Premiere (Movie editing software). Make sure it's compatible with your operating system

Total spend was under £650, so it soon pays for itself when considering that a hi resolution digital photo approx A1 from a photographer costs in the region of £80

What are the best camera settings? 
All cameras are slightly different but the settings are the same, referring to the manual will enable you to easily find these settings

  • Aperture set to A - this will keep the aperture locked, as shown below
camera apeture setting
Set to A on the dial

  • F stop should be set to f8 - f11 for more focus in the image. This is usually operated by a dial on the back and will change on the display screen 

camera f stop setting
Set between f8 and f11 by using the dial usually located top right
  • ISO set to100 - this lower setting reduces 'noise' or graininess. ISO is the sensitivity to light.

camera ISO setting
Set the ISO  to 100 via the main menu for camera settings

  • Shoot in 'RAW and JPEG' - RAW gives most digital information and JPEG is a compressed smaller file.

Camera RAW and JPEG setting
Set the Image to RAW and JPEG
  • White balance - you can use the preset  Auto, daylight etc

The Set up
  • The work should be fixed flat  to a vertical surface , such as a plain or neutral coloured wall/ greycard. I fix mine to a large piece of MDF on an either a desk or standing easel. It should not lean backwards. As shown in image at top of page.
  • The centre of the image should be the same height as the camera - measure this. 
  • The camera lens should be perpendicular to the image 
  • Make sure the camera and tripod are level
  • The distance of the camera - not too close as this will distort the image - you can use the zoom. You need to be able to view the whole image - don't worry about the surrounding extra space- this can be cropped later
  • Position the two softball lamps at 45 degree angles from the work - so approx half way between the artwork and the camera on either side of the work.
  • Do not have any other light entering the room, close the blinds
  • Set the camera to timer to avoid camera shake
overhead diagram of camera and lighting
Set up from above: Camera directly in front of artwork and lamps at 45 degrees.

Shooting
  • Turn on the soft ball lamps
  • Looking through the camera viewfinder, the image of the work should sit comfortably inside the viewing frame when shooting, there will be surrounding space. Don't worry about this it can be cropped later. 
  •  Fine tune the focus manually or with auto focus
  • Use the timer, to avoid camera shake
  •  Take lots of shots! Leave the camera set up in place just in case you need to do it again. 

Viewing the Photographs
Once you have your images you can put them onto the computer and view them by putting the memory card into the computer. Some new cameras have wifi so can be transferred direct.

File format 
There will be two formats on the memory card the RAW file and the JPEG. A RAW file is unprocessed digital data, so not compressed, it's a larger file but allows more scope post editing, especially with colour correction, which is all important with artwork. The RAW image will be grey looking but this is the better format particularly for the high resolution image. By contrast the JPEG is a smaller file and brighter on screen, which seems more appealing however every time the image is edited it loses quality, so if you adjust it several times it is compressed each time and the quality lessens. Once you have finished editing you can save a file as a JPEG.  The smaller JPEGs may be useful for web images etc. but the RAW files can be reduced in size and converted to JPEGs later. 

Colour space 
With regard to colour space management  ( the range of colours displayed in camera, monitor and printers)  your settings should be consistent. Use either sRGB for on screen images or Adobe RGB, which is better for print and higher resolution images. If your camera only offers sRGB then use the same in Photoshop for consistency. A RAW image does not have a profile so you can set it in Photoshop to by going to 'edit >colour settings' 

The monitor should also be colour calibrated, what you see on screen can look very different on different monitors, but you need to ensure what you are seeing are the actual colours, there are also various software and devices for this or in windows ( use the correct version of windows)


Editing 
View the files in any file viewing software and select what looks like the best and most in focus image from you shots 
The file will be large blow it up to view by using zoom to 100% or use the 'ctr' '+' keyboard shortcut and scroll around the image.

When you have decided on a contender open the RAW file in Photoshop you can also save your file. You can now begin editing.
final JPEG image of jade vine painting saved for web
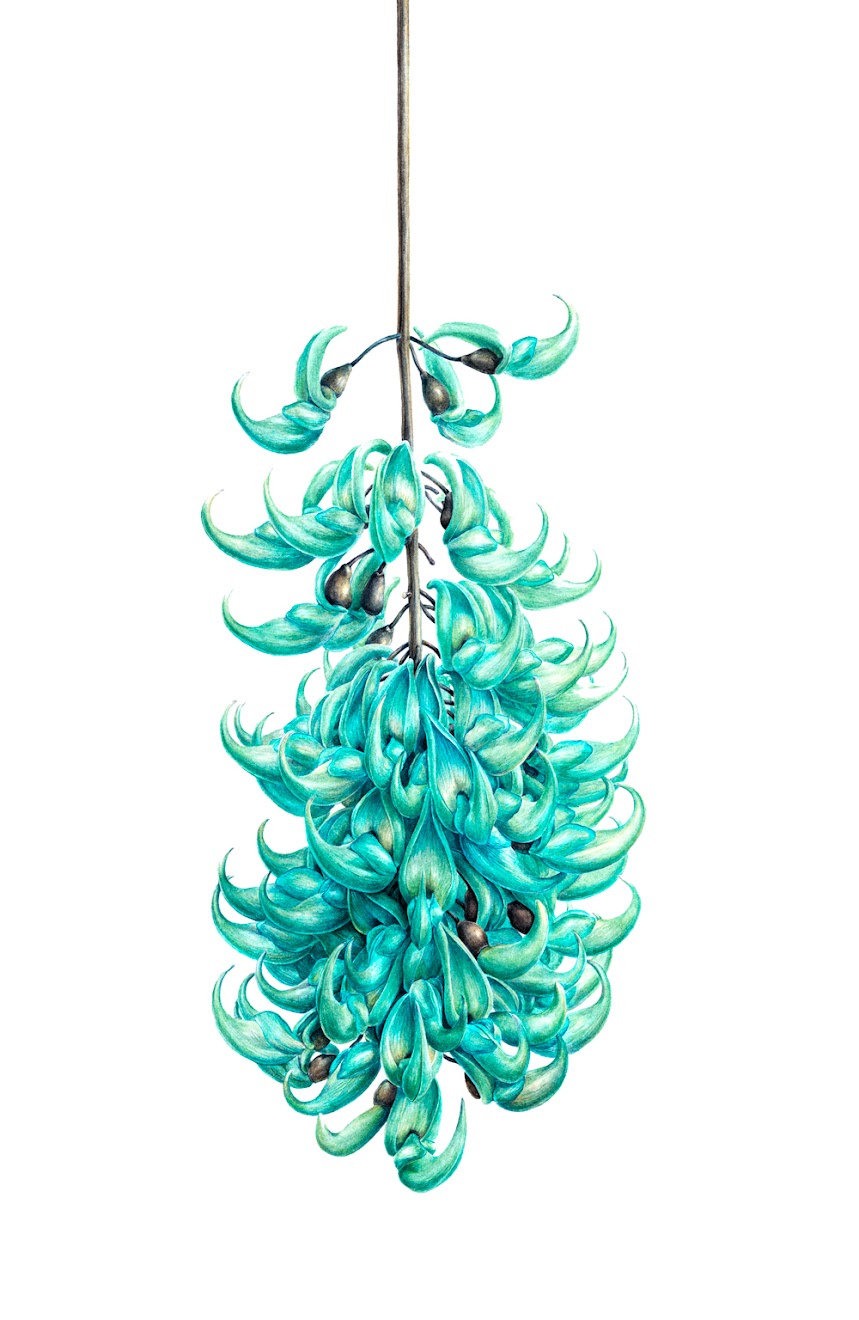
Final low resolution image after editing,  saved using the Photoshop ' Save for Web' facility

Apologies if this is a bit of a dull post but hopefully it's useful reference though. I usually write posts based on my own experience - so what I wanted to know but nobody ever told me! and wish I'd been able to find similar info years ago without all the hard work....... I've still much to learn but thought I'd share it.  More to follow at a later date on what you need to know in Photoshop and watermarking your image for online.

My next post will be back to painting and also one coming up on the sketchbook in Indonesia and Australia


Saturday 3 October 2015

Thirty Day Vellum Challenge Concludes....feathers, bugs and a few old favourites

Having made a late start to the challenge on Sept 5th, I was a bit worried that it wasn't going to be possible to paint 30 small vellum works in the 25 remaining days in September but forged ahead regardless but as predicted fell short of the full 30. I posted the first 10 previously so here are the remaining 15 - in no particular order. These are quick snaps taken on the phone but I'll photograph them properly before uploading to my Etsy shop where they will be for sale. All are painted life size with the exception of the feathers (x1.5)

Watercolour on vellum of a peacock feather
No 17. Peacock Feather, collected from the David Austin Garden back in July. I try to find one of the feathers every time I go there. The contrast from the glossy vibrant top compared to the downy base make this a great subject. It also has the tiny distinctive barbs which are tricky to paint at this size...W& N series 7 miniature, size 1 required! Colours winsor blue green shade and winsor green blue shade with some violet dioxazine. the feathery base is a mix of paynes grey and van dyke brown. I scratched away a few small highlights. This image is approx 4 x 3.5 inches.
It was a good opportunity for me to paint a few things that I might not normally have time for, such as feathers and insects.Feathers are great subjects because they are very ordered and smooth at the top but also have the light floaty base which is great to paint. Definitely a good exercise in painting texture!
Peacock feather painting
Number 16 The first small  Peacock feather painted. It has a very iridescent tip and great colour. I added a little of the Daniel Smith iridescent paint but I don't think it really added that much. I also used some titanium white on the downy parts but wished I hadn't, again not needed.

Blue Peacock feather painting in watercolour on vellum
No. 20 Another peacock feather, such a beautiful colour I don't think I do it justice, might try it again sometime I particularly like how the light catches one side of the feather and makes it so vibrant, whereas the other side appears quite dull until it's turned to the light and become this electric blue/ I used winsor blue green shade and prussian blue wit some winsor green ( blue shade). Both colours that I would almost never use in a botanical painting....with the exception of the Jade vine.

Small brown and green peacock feather painting, watercolour on vellum
No. 19,  I love this very small peacock feather, it's not one that I would recognise from this beautiful bird. Its very delicate and floaty

Small grey pigeon feather painting, watercolour on vellum
No. 22. Small Pigeon feather from down the lane. I'd found  a dead bird at the roadside so collected a few of it's feathers. This is on natural vellum using titanium white over a mix of paynes grey and van dyke brown washes. Not sure if it works or not.


Insects are always fun to paint on vellum, so I added a couple from my daughters collection. I had intended to do more but had to spend a few days away unexpectedly.

Red beetle painting on vellum, watercolour
No. 11 Gorgeous red beetle. The colours change in the light shimmering from red to green and making this very tricky. Vellum has to be the perfect surface to achieve these rich colours, shine and fine detail. Image is approx 2.5 x 2.5 inches

Green spotted beetle watercolour painting on vellum
Another Flower beetle for day 12. The white spot are easily removed from vellum with a scalpel so much easier than using masking fluid on paper. I also added a touch of titanium white on the spots catching the light to make it brighter than the background vellum colour.


Of course I also painted some of the more usual subject material for a 30 day challenge and there's no better time for this than late summer/autumn here in the UK. I did want to avoid repeating too many of subjects previously painted so although the rose hips were tempting I gave them a miss this year but couldn't resist the acorns again.

Three Acorns on vellum, watercolour painting
I did this in one day but I'm claiming it as days 15-17 because there are 3. Again collected from the graveyard next to my flat. These are pretty tiny acorns which I thought really cute.

Branch with Lichens, watercolour painting on vellum
No. 23, A lichen encrusted branch on Natural vellum. I did this very quickly, maybe 90 minutes in total so it's less detailed but I quite like a less detailed finish on natural vellum.

Decaying leaf painting, watercolour on vellum
No. 24, This old leaf was found in the lane and really was falling apart, there was no shine on it but I liked the holes and decay

Arum fruit painting, watercolour on vellum
No. 14 I discovered a patch of Arum fruits at the bottom of the lane which had been trampled on, so managed to rescue this one and paint it  before all the fruits fell off

Autumn leaf painting, watercolour on vellum
Day 18 - this one was featured in last weeks post - along with a video of the painting process
Honeysuckle berries, watercolour on vellum painting
Out of time! I made a start  on this honeysuckle fruit but have too many other things to do.... so that's all folks!