Being able to share work digitally is important for an artist,
whether on websites, blogs, social media or for exhibition submission - the quality of the image should always be accurate and true to the original. However photographing
botanical artwork is notoriously difficult and can yield some pretty
poor results, with loss of fine detail and grey uneven backgrounds. Even
with the best photo editing software - a bad photo will always be a bad
photo. We can of course always get a professional to do it but it's
pretty costly so that means getting to grips with the camera. I'm
definitely no photographer but have recently found that with reasonably
small investment and some perseverance it is possible to take fairly
clean sharp photographs which are certainly good enough for recording my
work. They may be of some use apologies for the 'wordiness'!
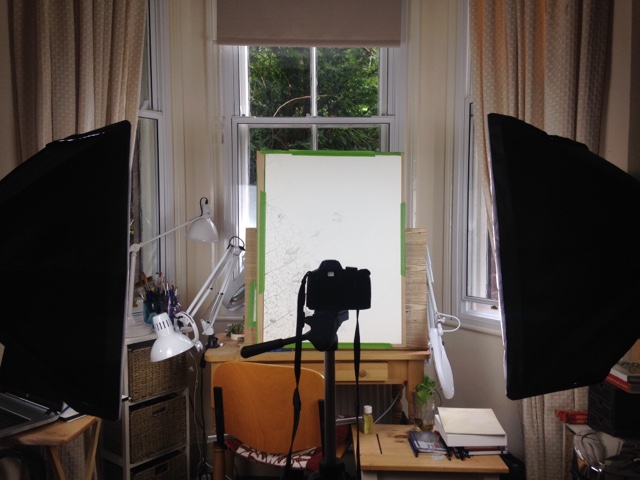 |
| Photographing artwork in my small work space. Two softbox lamps, a DSLR entry level camera, tripod and a vertical surface to support the work does the job! You will also need some basic editing software, I use Photoshop Elements 13 |
Print Quality
This post is not about print quality images but discusses digital images only. If I need images photographing or scanning for a print always use a professional with a good colour correction is service. Computer monitors are not generally calibrated for viewing print so what you see on screen differs from what comes out of the printer, and home printers and scanners are not up to a professional standard job - so my advice is get a pro to do it! Make sure that they are a member of the Fine Art Guild if you are in the UK.
Scan or Photograph
Personally I prefer photographs for capturing images at home. I have found most scanners tat I have used to be 'lossy' at the top and bottom end and do not give a good enough impression of your work, scanning work on vellum or very fine work is virtually impossible on a home scanner.
Digital Image Submissions for Exhibitions or Web Quality Images
These days most exhibition submissions are initially sent online, this can save a lot of time and money but it is vital to have accurate images of your work. Images requirements usually have specific dimensions or should be the same as the original in dimension and a minimum of 300 dpi. They tend to be very large files e.g. 10 MB or more, so check that your email is capable of sending large files there are other ways of sending these large files, such as Dropbox. Sending a poor
quality image is likely to result in automatic rejection. I tend to use
a professional service for some jobs but find that I can now actually photograph high resolution images myself with a little effort.
Web based images do not need to be of the same quality but the initial photograph should still be of the same high quality. Web images are sized to 72 dpi and the dimensions are much smaller too, say a 400 x 500 pixels image for a web page entry will do. Keeping images as small file sizes means that they load quicker and there is less chance of your image being printed out....at 72dpi the image looks good on screen but is low resolution for print.
It's worth spending some time to get
it right - after all it's just part of the job. A photograph taken under
different conditions can give totally misleading representation of your
work, as shown below.
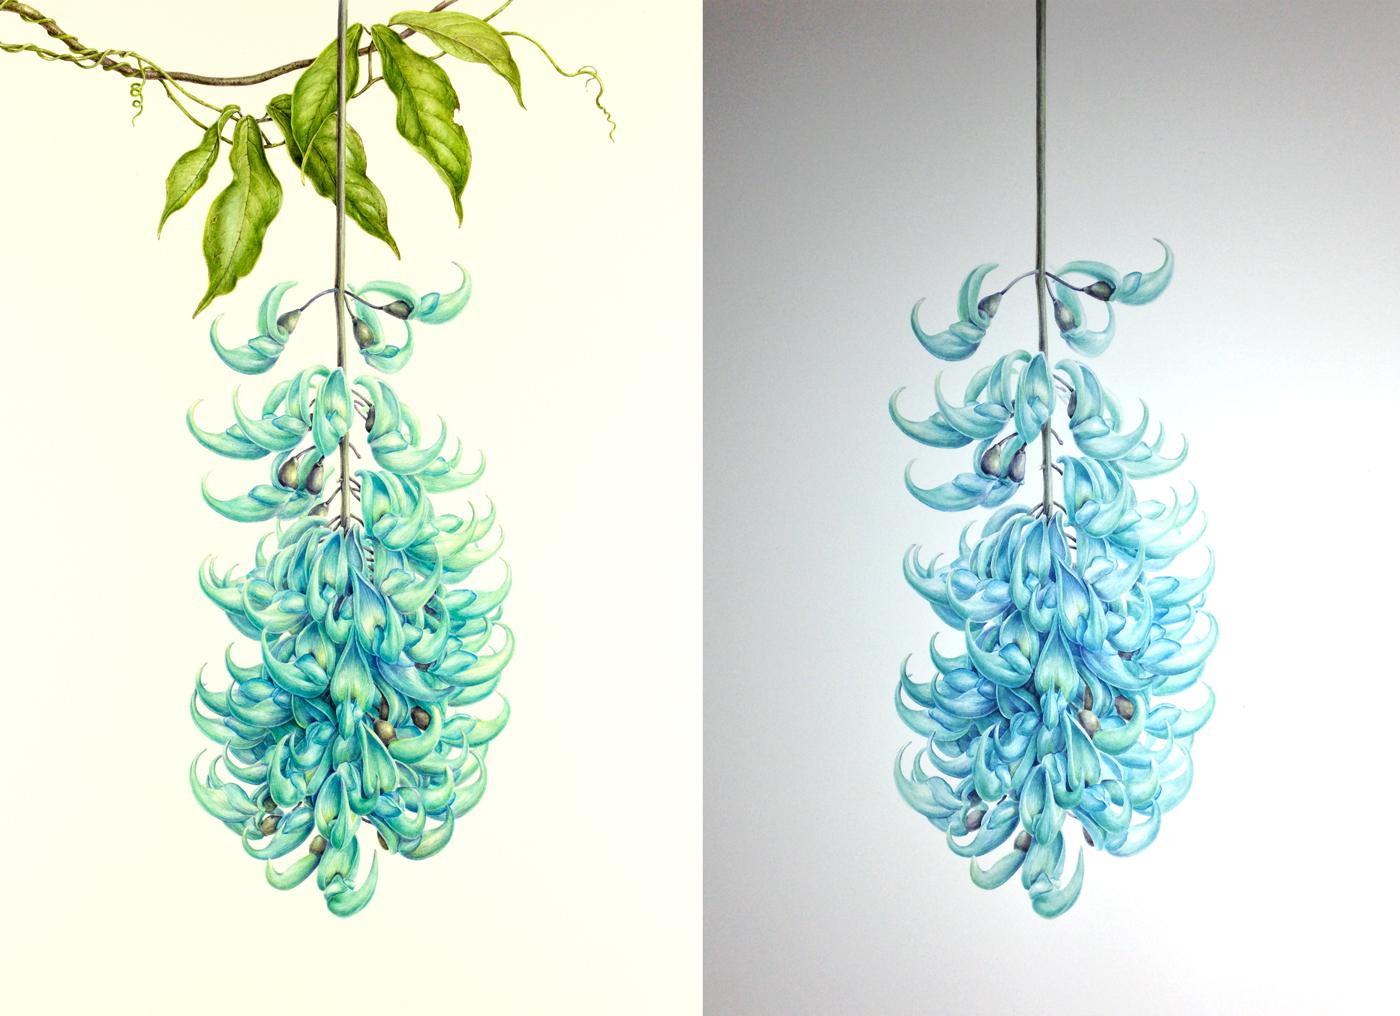 |
| On the left: This is the first photograph I attempted using the new lamps, although it still needed a little editing, it had a slight yellow cast and darker at the top but it's clear to see how much better it is than the dreadful photo on the right, The photograph was a RAW file was taken using the set up and equipment described in this post and edited using Photoshop Elements, it was saved as a JPEG here, I have a life size 300 dpi version a web sized 72 dpi version ( shown here ). On the right a poor quality photograph taken in uneven natural day light on a dull day ( admittedly an extreme example!). It's easy to see the difference, the image is grainy, grey/blue and and has uneven light, the colour is completely wrong! It is possible to take reasonable images in natural daylight but in general they are not up to standard. I tried to edit the image but it was a lost cause. The left hand image also maintains the natural colour of the paper unlike many 'Photo-shopped' images which have an unnatural white background yet the image itself is darker then it should be so has a hard edge compared to the original.An example of the stark 'over-photoshopped' image below, close inspection will reveal small missing bits and ragged edges. |
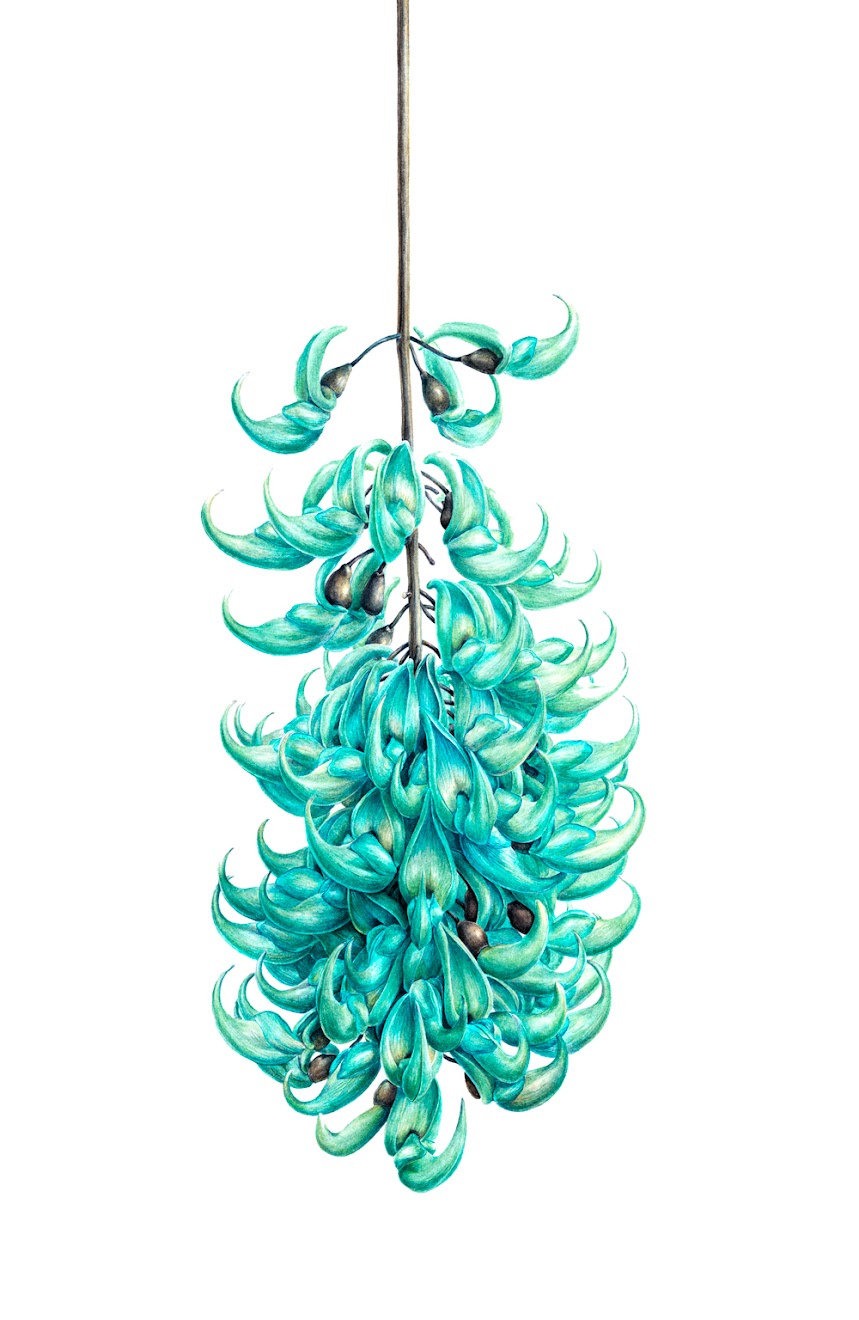 |
| Unnatural! Photograph taken in natural light on a tripod. The original was too dark so I attempted to edit it in Photoshop. The result is completely inaccurate colour and hard edges cause by using the Photoshop Magic Wand facility to grab the image and clean the background, this always leaves the image too dark and bold compared to the original, also because botanical work has some soft edges it can leave white gaps! It's a complete misrepresentation of the work. Scroll to the bottom of the post for the final image. |
Equipment and Software for Photographing Work
Doesn't have to cost the earth but but you will have to spend something. You will also need photo editing programme. Don't be scared of Photo editing because you only need to know a few moves, such as image size, crop and editing such as colour and levels. I'll deal with the editing in a separate post.
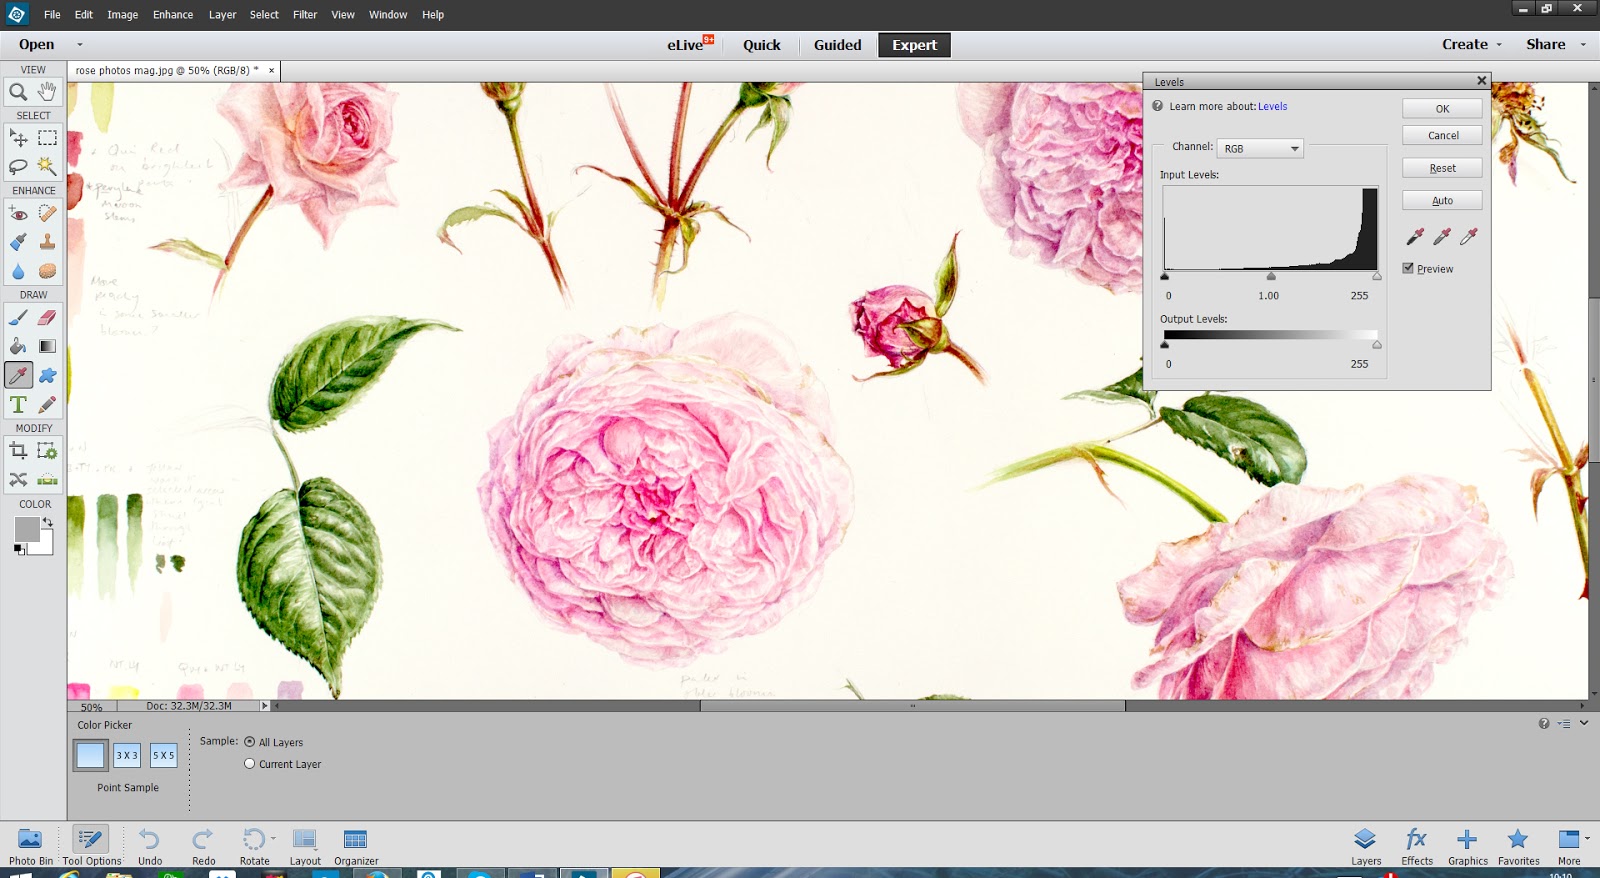 |
| Using Photoshop Elements to edit your images isn't so difficult if you have a decent photograph to start with, I use only a few functions, Edit ( for cropping) Image ( for sizing) and Enhance ( for colours and levels). These functions will do most of the work |
So what to buy and how much will it cost? ( assuming that you have a computer)
A decent DSLR camera - this can cost a lot but an entry level camera is good enough e.g. Nikon or Canon. I use the Nikon D3200 or Canon 100D ( my daughters) , cost about £350 -£400 I also have an older Sony and they're all good enough to do the job.
Tripod - £50 plus. Obviously the more you spend the better in terms of stability
Two soft box lamps for diffused lighting -
£60 - £100
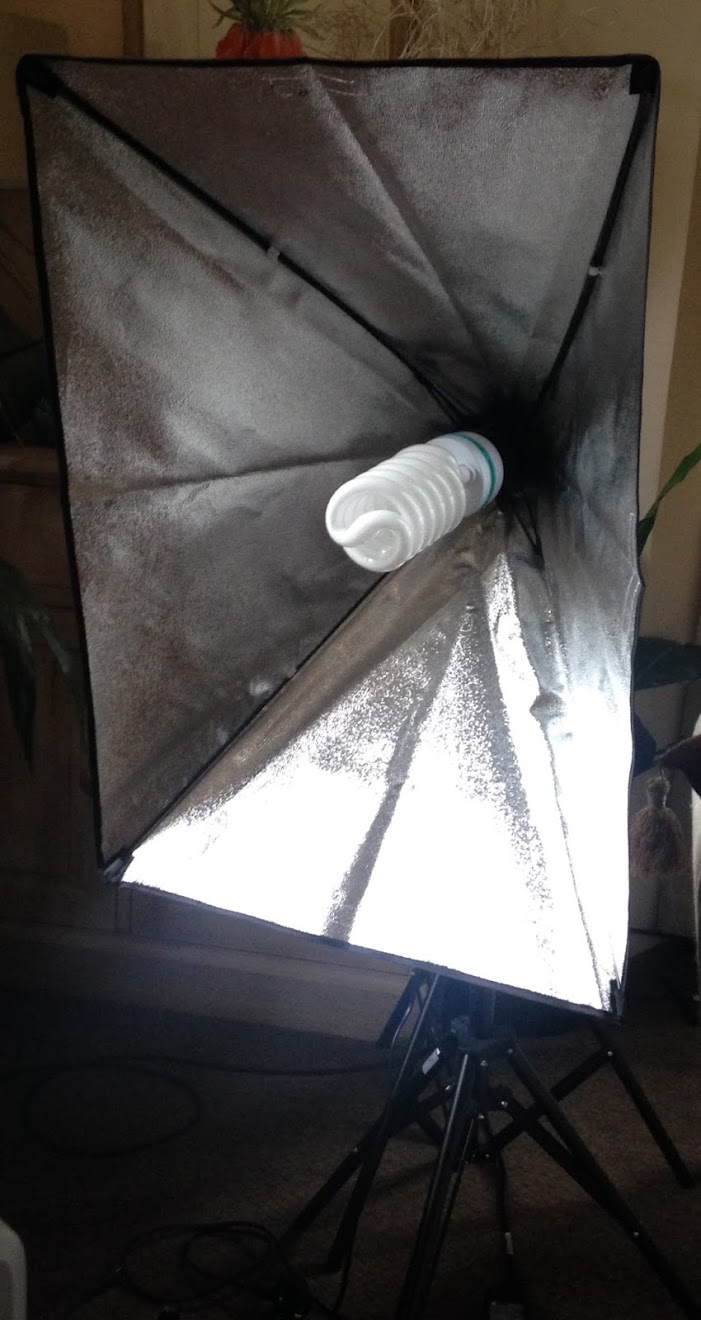 |
| Soft Box lamp - a cover goes over the front and diffuses the light.It folds away into a bag for storage. The large bulbs are 5500K ( Kelvins) which simulates natural white daylight. Lower K bulbs give a yellow light and higher K bulbs a blue light. They also have a CRI or colour rendering index of over 90 which is essential for accurate colour. |
Photographic grey card- not essential but can be handy
Memory card for the camera for transferring images - you will need a decent sized card as the files are large, such as the compact flash card, San Disk I use a 64 GB or 128GB card, cost around
£20 to £40. Check compatibility with your camera, some only take smaller cards.
Software, Photoshop Elements 13 for editing, cleaning and sizing the image - the latest version is 13 but previous versions will do the same this cost approx £85 as a bundle with Premiere (Movie editing software). Make sure it's compatible with your operating system
Total spend was under £650, so it soon pays for itself when considering that a hi resolution digital photo approx A1 from a photographer costs in the region of £80
What are the best camera settings?
All cameras are slightly different but the settings are the same, referring to the manual will enable you to easily find these settings
- Aperture set to A - this will keep the aperture locked, as shown below
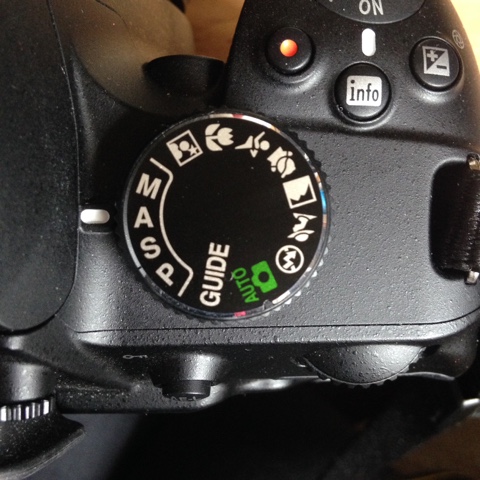 |
Set to A on the dial
|
- F stop should be set to f8 - f11 for more focus in the image. This is usually operated by a dial on the back and will change on the display screen
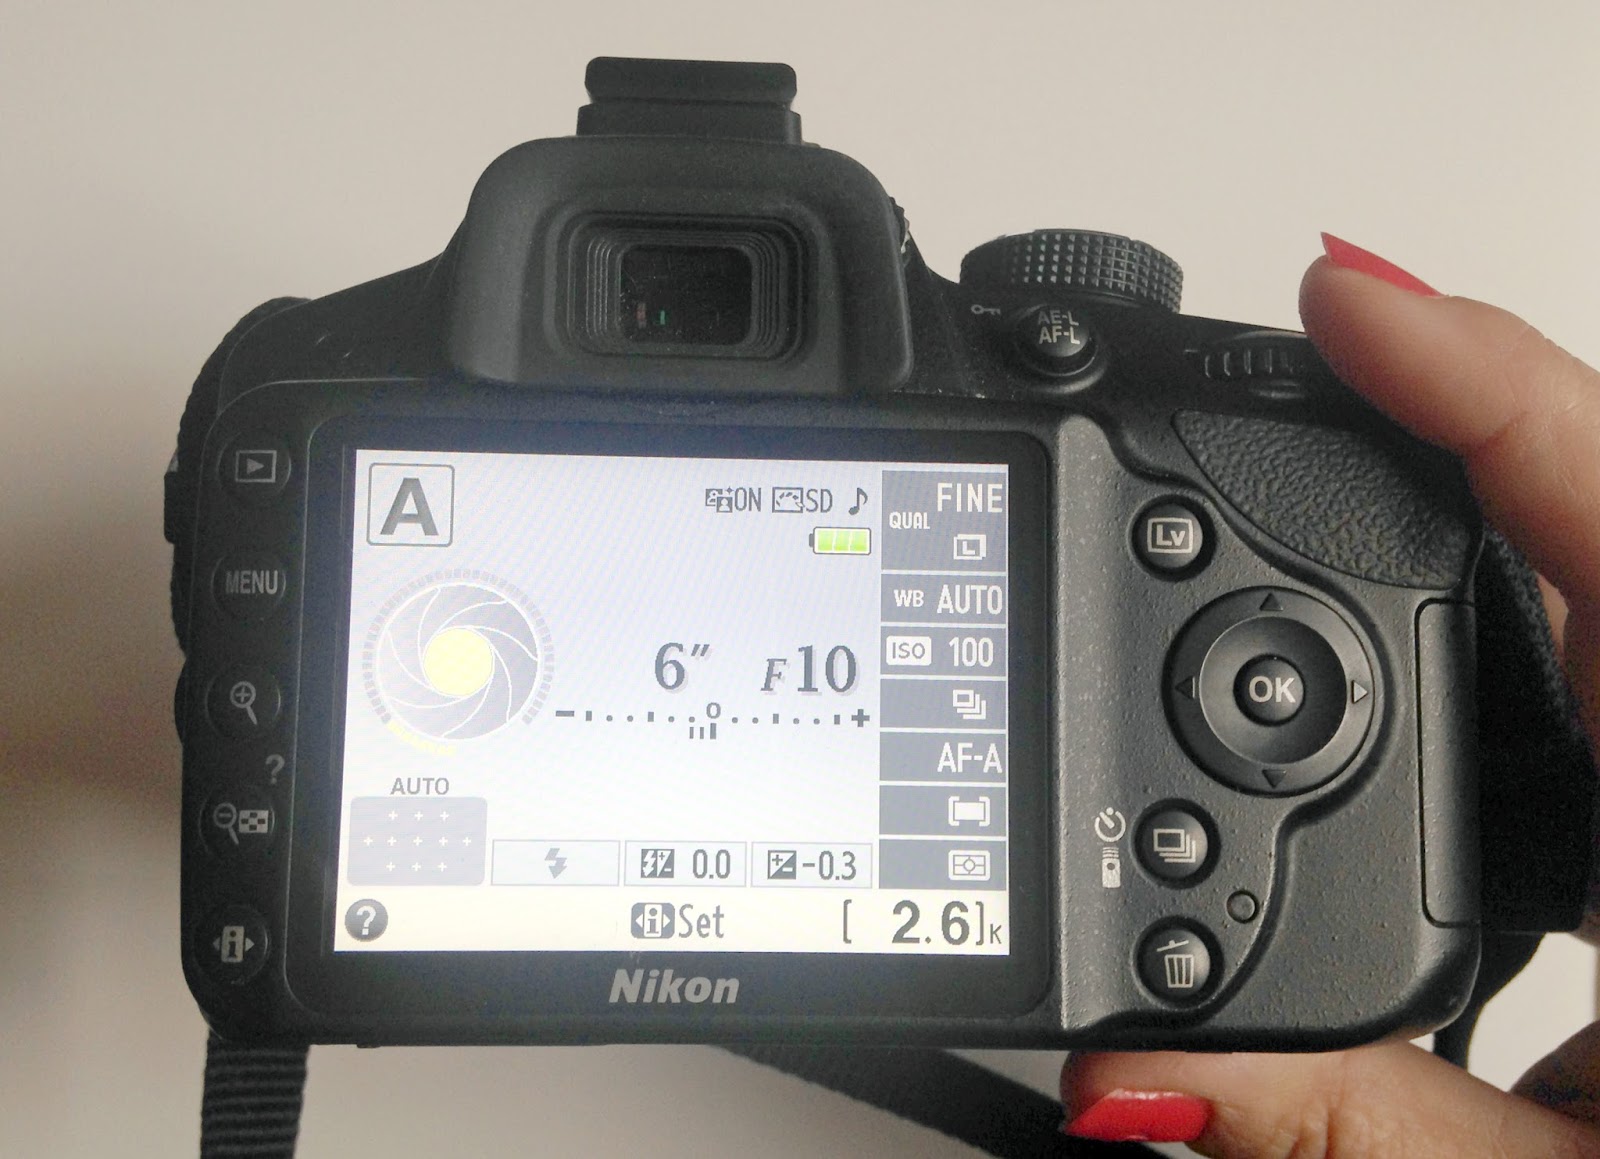 |
| Set between f8 and f11 by using the dial usually located top right |
- ISO set to100 - this lower setting reduces 'noise' or graininess. ISO is the sensitivity to light.
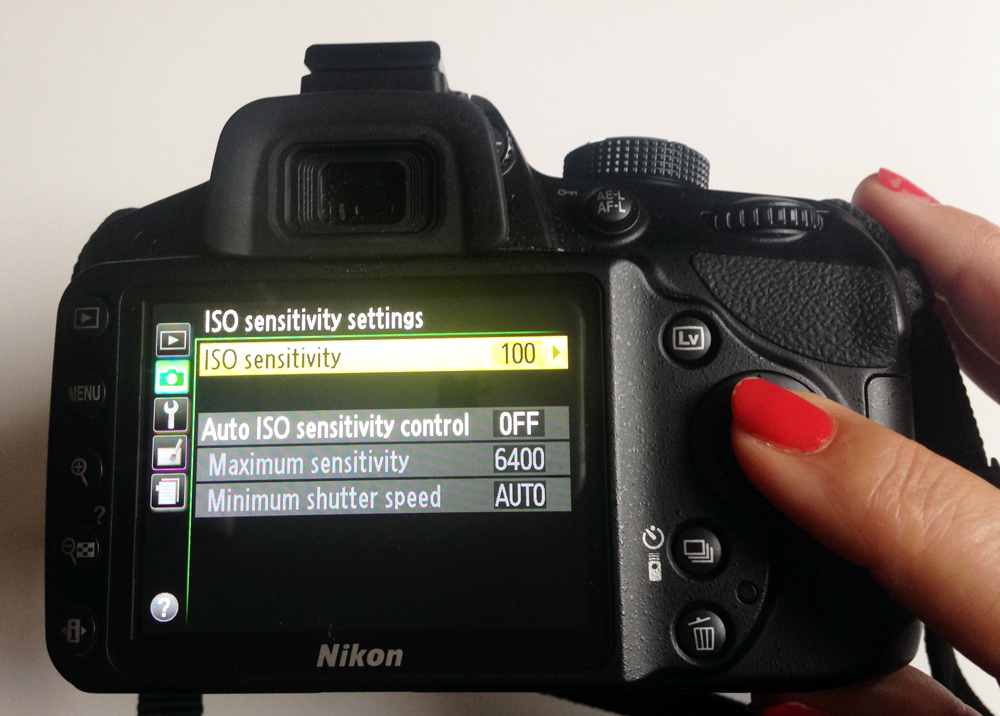 |
| Set the ISO to 100 via the main menu for camera settings |
- Shoot in 'RAW and JPEG' - RAW gives most digital information and JPEG is a compressed smaller file.
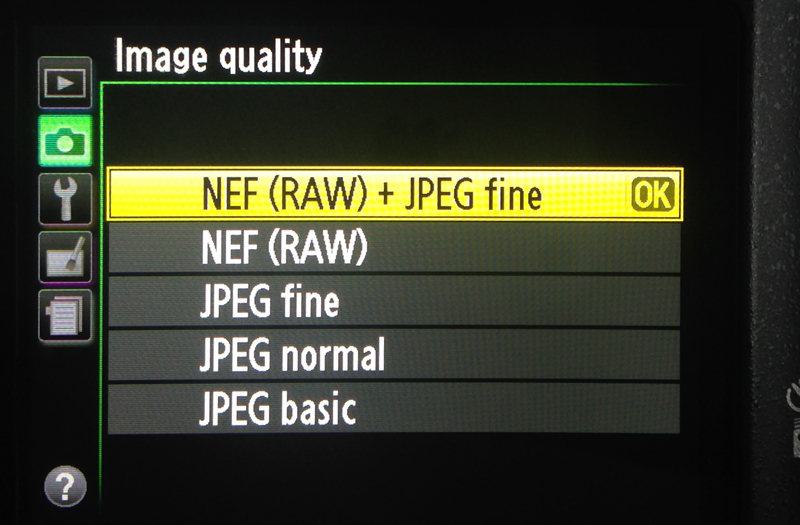 |
| Set the Image to RAW and JPEG |
- White balance - you can use the preset Auto, daylight etc
The Set up
- The work should be fixed flat to a vertical surface , such as a plain or neutral coloured wall/ greycard. I fix mine to a large piece of MDF on an either a desk or standing easel. It should not lean backwards. As shown in image at top of page.
- The centre of the image should be the same height as the camera - measure this.
- The camera lens should be perpendicular to the image
- Make sure the camera and tripod are level
- The distance of the camera - not too close as this will distort the image - you can use the zoom. You need to be able to view the whole image - don't worry about the surrounding extra space- this can be cropped later
- Position the two softball lamps at 45 degree angles from the work - so approx half way between the artwork and the camera on either side of the work.
- Do not have any other light entering the room, close the blinds
- Set the camera to timer to avoid camera shake
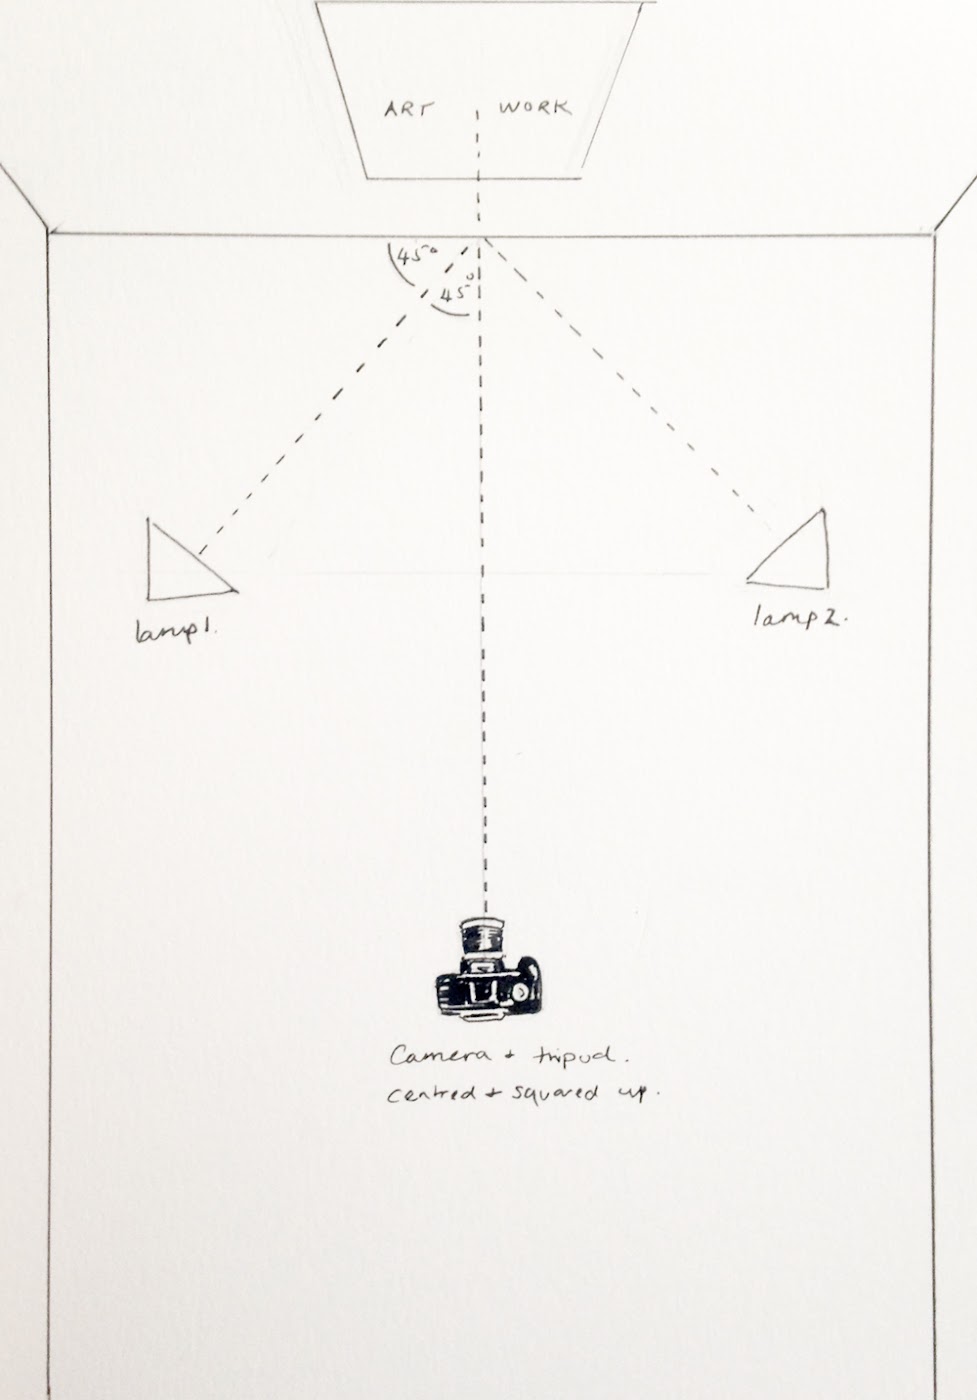 |
| Set up from above: Camera directly in front of artwork and lamps at 45 degrees. |
Shooting
- Turn on the soft ball lamps
- Looking through the camera viewfinder, the image of the work should sit comfortably inside the viewing frame when shooting, there will be surrounding space. Don't worry about this it can be cropped later.
- Fine tune the focus manually or with auto focus
- Use the timer, to avoid camera shake
- Take lots of shots! Leave the camera set up in place just in case you need to do it again.
Viewing the Photographs
Once you have your images you can put them onto the computer and view them by putting the memory card into the computer. Some new cameras have wifi so can be transferred direct.
File format
There will be two formats on the memory card the RAW file and the JPEG. A RAW file is unprocessed digital data, so not compressed, it's a larger file but allows more scope post editing, especially with colour correction, which is all important with artwork. The RAW image will be grey looking but this is the better format particularly for the high resolution image. By contrast the JPEG is a smaller file and brighter on screen, which seems more appealing however every time the image is edited it loses quality, so if you adjust it several times it is compressed each time and the quality lessens. Once you have finished editing you can save a file as a JPEG. The smaller JPEGs may be useful for web images etc. but the RAW files can be reduced in size and converted to JPEGs later.
Colour space
With regard to colour space management ( the range of colours displayed in camera, monitor and printers) your settings should be consistent. Use either sRGB for on screen images or Adobe RGB, which is better for print and higher resolution images. If your camera only offers sRGB then use the same in Photoshop for consistency. A RAW image does not have a profile so you can set it in Photoshop to by going to 'edit >colour settings'
The monitor should also be colour calibrated, what you see on screen can look very different on different monitors, but you need to ensure what you are seeing are the actual colours, there are also various software and devices for this or in windows ( use the correct version of windows)
Editing
View the files in any file viewing software and select what looks like the best and most in focus image from you shots
The file will be large blow it up to view by using zoom to 100% or use the 'ctr' '+' keyboard shortcut and scroll around the image.
When you have decided on a contender open the RAW file in Photoshop you can also save your file. You can now begin editing.
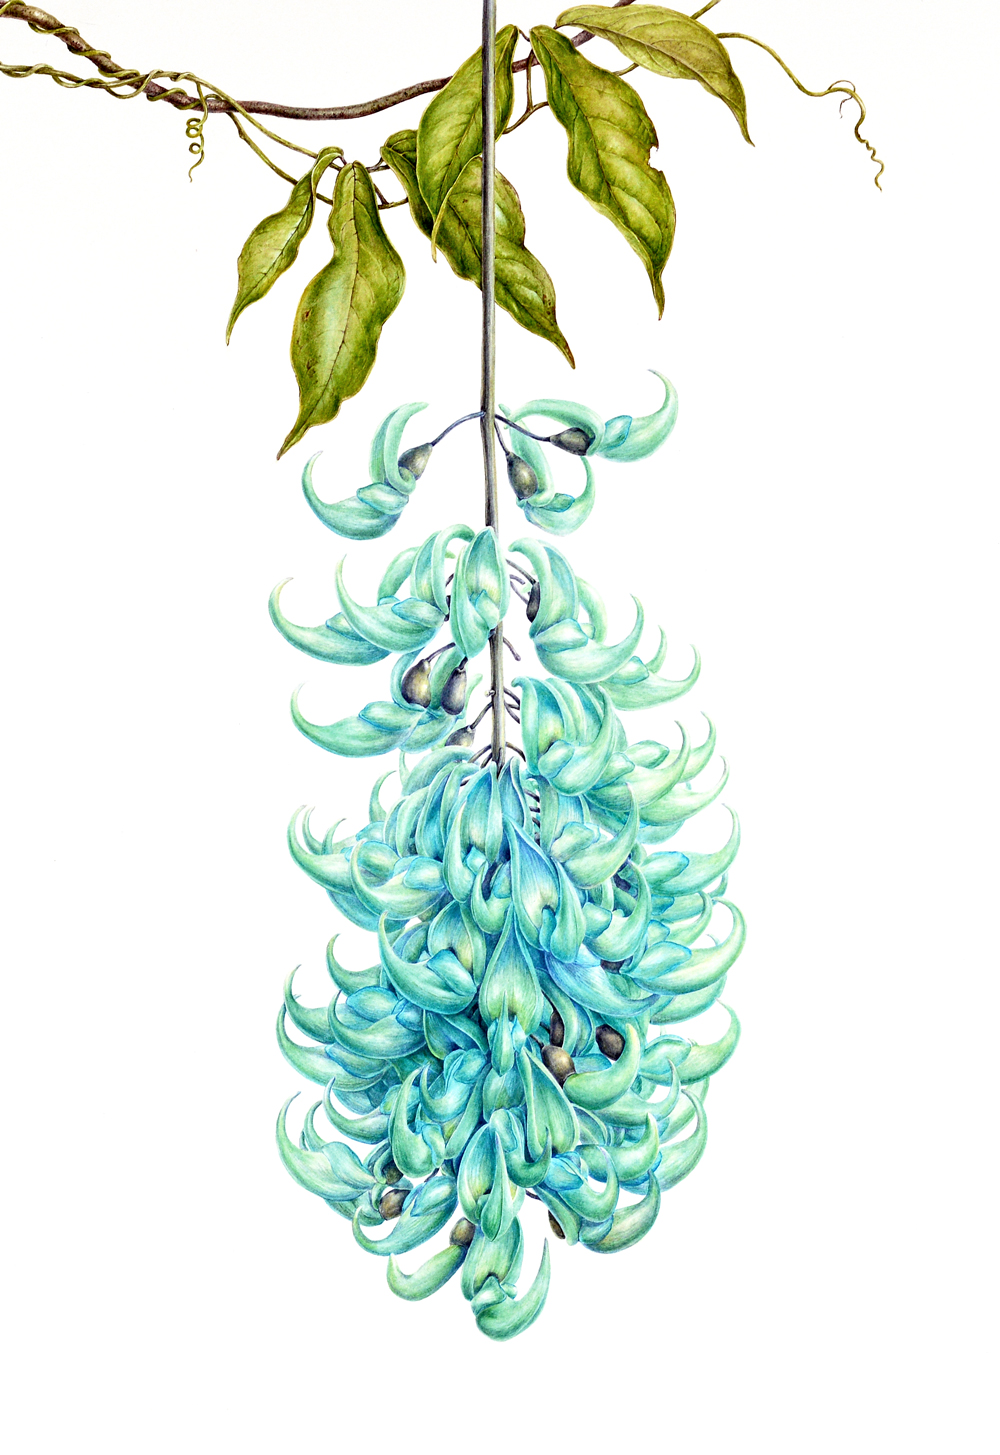 |
| Final low resolution image after editing, saved using the Photoshop ' Save for Web' facility |
Apologies if this is a bit of a dull post but hopefully it's useful reference though. I usually write posts based on my own experience - so what I wanted to know but nobody ever told me! and wish I'd been able to find similar info years ago without all the hard work....... I've still much to learn but thought I'd share it. More to follow at a later date on what you need to know in Photoshop and watermarking your image for online.
My next post will be back to painting and also one coming up on the sketchbook in Indonesia and Australia


 Posts
Posts


